Showing posts with label review. Show all posts

Thursday, October 7, 2010

Locomotive Roster: BLS Class 420; Minitrix 12781


Its been a while since I've talked about any of my locomotives so - while the layout is still a mess - I thought I would try and catch up.   This Minitrix BLS Class 420 is my second BLS locomotive, but like my first one, I love the color scheme and the lines of both of these a lot.  The color scheme is striking to me...the use of that funky neon green against the silver/metal body, with the bold, dark blue stripe has such an awesome modern look to it.

Additionally, the BLS is a Swiss railway I've only barely begun to understand, but it has a really fascinating history and one that seems to me to be quite unique (its history sounds very...American, if you will, compared to most of the railway histories in Europe - reminds me a lot of the competiton between the Great Northern and the Northern Pacific here on the Pacific Coast of the US).  The brief history on Wikipedia of this unique line is pretty fascinating reading.
This locomotive from Minitrix is also quite fascinating!  The detail work and crispness of the painting is up to the typically high standards that I've come to expect from Minitrix.  The 'silver paint' has a very convincing look for the 'steel' of the locomotive body...something that is often quite difficult to replicate on these plastic shells!

Although I have not had much time to run it given the ongoing layout renovations in the past year, the motor is whisper quiet with smooth acceleration and deceleration. 

While it is quite easy to bemoan the high cost of Minitrix compared to say, Kato, there are differences which should be pointed out in all fairness.  First, as I mentioned above, the low noise factor indicates some level of modern engineering expertise that I don't expect can come cheaply to any firm.  Second, a look at the underside of this locomotive reveals the metal gears and other metal parts, which represent a level of quality (one assumes) that is much more expensive to produce than with plastic gearing and parts.  Does this mean this locomotive will have a longer life expectancy?  Let's hope so given that the costs of these are so high compared to a similar Japanese locomotive!  And as is typical with European N scale locomotives, you have the option of using overheard catenary to pick up electricity, which is also a feature which adds to the cost (note the red switch in the below photo).
Like most modern production from European manufacturers, the smart NEM 651 socket feature is provided and is easily accessible with the removal of the shell.   I've said this before, but this is hands down the best system for adding DCC out there, and it would be great for all modelers if other firms adopted this method (Atlas? Kato?).  A nice overview of the simple process of converting one of these locomotives to DCC can found at N-Gauge Blog.  The decoder installed in this locomotive is the Trix 66838.  This is not my first choice as they tend to be more expensive than Lenz or ESU decoders, but this was all that was available at the time of purchase!

So...here's the bad news.  Despite the ease of adding a decoder I ran into some issues when I first attempted to read the decoder,; that is....an error.   Even attempting to communicate to the decoder using the default address of "3" resulted in no response from the locomotive.  I took it back to Walter at Euro Rail Hobbies and he couldn't get it to work at his shop either.  Leaving it in his reliable hands for several weeks, he later returned it to me in good working order, but had to make some soldering repairs to the circuit board where (apparently if I recall correctly) it was not properly soldered.

Unfortunately, this issue with Minitrix circuit boards, specifically regarding the contacts of their NEM 651 sockets is not an isolated case, as I've read of several other owners having similar quality issues on some of the European Railway message boards.  Let's hope Minitrix gets this quality issue sorted out quickly (if they haven't already) - its really not at all acceptable given the prices they charge not too mention the damage this does to the brand's reputation.  

The good news is that I got this locomotive through a dealer who can also service these locomotives and the fact that Minitrix does have a 2 year warranty on its products.

It works fine now and I'm looking forward to seeing it stretch its wheels out on my new viaduct in the near future as the messy parts of my layout expansion get completed!

Sunday, October 3, 2010

Hack Bridges ("Hack Brücken")

Quick post on some bridge options that are new to me, and may be something interesting to other folks.   A company called Hack Brueken (Brueken - or Brücken - means 'bridges' in German...Thank you Google Translate!) creates pre-assembled metal bridges in an interesting array of styles and lengths (and in multiple scales).  I came across these bridges on eBay and from the description seemed like a something worth checking out for my overpass on the 'red line'.  I have to say, I am very pleased!


Despite being made of metal, they are very lightweight, and definitely feel more solid than any plastic kit you would purchase and assemble (well, maybe not you, but for me..... yeah, some of these plastic kits require far more dexterity and patience and skill with tweezers than I have, but that's another story....).  While very close inspection does not show a lot of detail (e.g. no rivets), I find the general scale of the girders and beams to look a bit more 'realistic' than the usually much thicker 'plastic varieties'.  I think each has its place, and the idea for me is to have a little bit of diversity on the layout for different lines, so it works for me to have both.  Below is the Kato double-track bridge compared to a Hack single track bridge I'm using on my 'expansion':
I like the arched through-truss bridge so much, I ordered a shorter deck-truss bridge as well, although I'm a little undecided about where it will go. 
Full disclosure is that I know very little about bridge types, so if my 'through-truss' and 'deck truss' descriptions are wrong, I got the explanations from ye olde Wikipedia.

So if you're looking for a bridge that is a bit different than the normally available ones, I'd recommend checking out "Hack"...either on eBay or on their website (I shouldn't have to say this, but I have no relationship with this company, just passing on some neat stuff I found).

Sunday, November 8, 2009

Japanese Wheel Cleaner for N Gauge


Above is the box for a nifty little item I picked up from PlazaJapan on eBay. Its from a Japanese manufacturer called Tsugawa Yokou, and its an interesting, simple, and seemingly very effective device (and did not require any soldering or decoder installation! :-)).

Below is what you get, and although all the materials and instructions are completely in Japanese, its not that hard to figure out! Plug the two alligator clips to a power source and start cleaning!

For only about $20 USD, this is a pretty cool device. I haven't used it a lot yet, but I expect I will. In my experience, I have really wanted an easier method of cleaning wheels for a long time (I always hated to put dirty wheels on 'just cleaned' track! Arg!)...this seems to do the job!

Below is a short video showing it work. The wheels basically sit on a foam material with enough conductive material in them to transmit power to the locomotive. Cool, huh?

Monday, November 2, 2009

Locomotive Roster: Kato DF 200 Red Bear

Another one of my recent acquisitions is the Kato model of a Japan Railways Freight DF 200 diesel locomotive. As is typical with most new Kato locomotives, the quality is great and the price and value are equally as satisfying!
Although this model doesn't come in DCC, Kato has made it very easy to convert (let's hope this is the trend, and that their friends at Tomix pick up on this!) with the replacement of the 'stock' light board with a new Digitrax DN163K0a decoder (which is also a light board and the decoder all in one unit). Digitrax describes this decoder as being for US outline locomotives (GP'9's etc...) but it works just fine with the DF 200 with the only change being that you'll need to shorten the leads to the LED's on the ends (which will require a bit of soldering). A fantastic description and tutorial of how this was done is on the Japanese Rail Forum.
I have to also mention that this locomotive and decoder were easy on the wallet! The locomotive ran about $80 USD, plus another $35 for the DN163K0a, for a total of $115 for a nice DCC equipped loco! Hmmm...in an earlier post, I praised the NEM 651 interface, but with a little soldering, these Digitrax 'drop in' decoders are a pretty good deal too (and I like the price compared to the $45 and up cost for typical NEM 651 decoders!). Although I wasn't that impressed with the process when I made a similar installation on my Kato Thalys, this was relatively pain free!

Its a fantastic, seemingly powerful little locomotive, while at the same time, being much quieter than older N Scale locomotives (which is, I find, something I am starting to expect more and more whenever I hear an old 'growler' from previous decades!). I was really drawn to the "Bo-Bo-Bo" trucks on this modern diesel, and the "Red Bear" logo and branding gives this engine some distinct character.

Yes, I will pursue my heresy and run this alongside locomotives from other countries. The only reason I might have hesitated is that the 1:150 scale of this diesel might look out of proportion to other locomotives at 1:160, but I haven't found this noticeable.

Thursday, August 20, 2009

Fleischmann / Roco Warranty Blues


I miss my Deutsche Bundesbahn Class 64!

I discussed some of my issues with my Fleischmann BR 64 locomotive in a post last winter. The BR 64 was performing very poorly and it was obvious something was really wrong. According to my dealer, the issue is that there is a gear issue and it is causing the wheel drive to get stuck and thus the poor performance. It seems that this is a clear design flaw that cannot be repaired and the locomotive needs to be replaced (good for him!) :-) He also informs me that my locomotive is one of four he has seen with the same problem (ouch! Bad for Fleischmann/Roco!).

It seems that when Roco acquired Fleischmann last year, all the Fleischmann managers were let go and there was also some signficant reorganization (both physical and organizational) which helps to explain the delay. That doesn't mean that I think this delay is acceptable, however. This is one of those occassions where a good dealer really pays off, they've already made their margins on this deal, and they do this all to support their customers. The benefit to the dealer (in this case) is that I definitely have high confidence in purchasing from them in the future! Thanks Walter!

For Fleischmann / Roco, however, another story. Given the relative premium they charge for their products (they seem to be the highest, even compared to Minitrix) I would like to expect a bit more from them right out of the box (especially as this locomotive came as part of a 'starter set'! What kind of impression does this leave with someone new to the hobby! Arg!!!) and despite a two year warranty, one certainly does not expect that a locomotive will spend a good portion of that time somewhere in a warehouse waiting to get 'looked at' rather than quickly replaced!

I hope this is not the future direction for the new Roco company and its Fleischmann acquisition, but we have seen similar sad developments in this hobby in the past. I would be interested to know if any others are also experiencing these sort of problems with Roco / Fleischmann?

Sunday, April 19, 2009

Locomotive Roster: Kato Series 787 Relay Tsubame!


My roster to date has been filled with locomotives and trainsets from Germany, Switzerland, France, and the Netherlands. Now add Japan to the roster. "Unprototypical" you say? Yes, but this is Quinntopia... where I control the people, the roads, the buildings, and even the trains. :-)

The fact is, the country of origin of each of my trains is almost as interesting as the various designs, schemes and histories, and its my enjoyment of all these assets that allows me to enjoy and appreciate the world of model railroading so much.

And there is a lot of fantastic design (in my mind) with the Series 787 Relay Tsubame. Additionally, there is a level of quality, value, and care in the model created by Kato that is almost equally amazing.

This is a seven car set of very high quality, and yet it cost at least half of what I would pay for an equivalent set of a European outline. The set also comes packaged in, what I am sure to the Japanese is the 'standard', a very nice case that allows you to easily store or display your set (in Quinntopia, however, we demand that all of our loco's earn their keep! There will be no slouching on a shelf for this railroad!).

This set was also my very first actual DCC installation that did not either already come with DCC or merely required the installation of the decoder via a NEM 651 adapter (the Kato Thalys is something of an exception, it required the replacement of the stock DC light board with a ESU light board which has an NEM 651 adapter).

Needless to say, I was a bit intimidated. We've all read the posts and horror stories of decoders getting fried, the work required to 'mill out' enough space to install the decoder, etc, etc....

Fortunately, the good people over at the JNS Forum were able to assist me with valuable photos and their experiences with similar installations.

The experience was not too bad, owing more to the fact that there is plenty of space to install the decoder for the motor - plus the 2 decoders for each of the end cars (for the lights) - than any skill I have! I made a couple of stupid errors...not only getting a bit sloppy with the solder (I'm still learning!) but initially soldering the decoder leads to the wrong side of the electrical contact strips! See photo at right...this is NOT how to do it!

Well, that error was fixed and probably wouldn't have done any damage, because once I finished that part, I realized there was no way the contacts would fit back in the shell! Cleaned it up and repaired it, and no damage done.

I was also overly generous in the length of my decoder wires, and thus have more wire than I need. Sounds like a good thing, right? That is until you have to try and figure out how to stash all that excess wire so it doesn't look like the interior of your passenger cars is consumed by some large multi-colored octopus.

Other than some decoder programming issues with my Mobile Station (more on that in a future post), I am now able to enjoy a very cool, sleek, and tough looking electric train set from Japan. This will be the first of many trains from the other side of the world.

Tuesday, April 14, 2009

Fleischmann and Trix Warranty Woes and Cheers

A quick post to share my (limited) experience with warranty service from the two main German N Scale manufacturers. I write this as I just shipped off my Kof II back to the dealer who will likely send it back to Germany for warranty service (unaccountable stops and stalls, which I think are more than just a symptom of the locomotives limited electrical contacts and dirty track issues). I am somewhat optimistic, as my one other experience with Trix was very positive.

And since these manufacturers do offer at least a one year (I see most are moving to two year) warranties, I intend to take advantage of it!

Trix / Marklin: "CHEERS!"
My Trix Mobile Station stopped working late last summer. Unable to resolve this through the manual, I took the somewhat intimidating step of collecting my reciept, composing a mail, and shipping the Mobile Station off to the Trix repair address in Germand.
Within a couple of weeks, I recieved an email notification that they had recieved my item and were working on it.
Less than 5 weeks after sending it, it was returned to me and has worked perfectly since then.
In my estimate, excellent service and responsiveness from Trix / Marklin.

Fleischmann: "Jeers"

I purchased a Fleischmann digital starter set last year, but had some problems with the Class 64 steam locomotive that came with it. Apparantly, it seems like it could be the drive rods are binding up, or something is wrong with the motor. I returned it to the dealer, and after an intial attempt to repair, I still experienced the same symptoms (jerky movement, stopping). The dealer then sent it back to Fleischmann in Germany for repair. Unfortunatly, this was back in late September, and as May is approaching, that means over 6 months with the manufacturer.
As my dealer explained to me, the Fleischmann/Roco merger is not going all that smoothly and a lot of things are delayed and not going entirely well. Be that as it may, 6 months for a warranty repair? Seems very excessive.

Again, neither of the above are representative examples given the small sample, but clearly my confidence in getting back a repaired Kof II from Trix (however, there's obviously the bankruptcy issue with Marklin / Trix at this time!) is much higher given their fantastic performance with the Mobile Station.

Sunday, March 15, 2009

Product Comments: Brawa pin socket LED lights

When I first came across these novel lighting products from German manufacturer Brawa, I was blown away with what a great idea these were! Brawa has produced N Scale lights that use a small metal pin which is inserted into a socket that you install in your layout, allowing for flexibility and stability that is hard to achieve with other alternatives. Additionally, they are LEDs which means that you get a light that will last much longer than a conventional incandescent bulb, plus low heat, and low power consumption. The 'plug and play' simplicity of the pins and sockets mean that you can change light fixtures as you wish, and if you need to replace a bad bulb (in theory with LED's, a rare occurrence?), changing the bulb/light fixture cannot be easier.

I love this idea and despite the relatively hefty per light price, it seems like a good investment. A Brawa 4000 (single, curved street light) goes for about USD $11-13. Brawa's similar non-Led and traditional wire version is about 30% less at USD $7-8. Of course, you can go with the very cheap Model Power versions, where you can get a pack of 3 for about $6-9. I don't care much for the Model Power versions despite the price (they just look cheap to me). Brawa has a similar 'traditional' model as well (the #4596) but this has the same challenges and limitations as the Model Power lights.


Brawa continues to come out with new light styles, with remarkable quality for N scale, allowing you to change lights or 'upgrade' if you find something that better creates the ambiance you are looking for. Take a look at the picture of the two lanterns near my cathedral.

The only 'down side' with these lights is that they are definitely the 'blue-ish' white type of LED's, and not the more 'warm white' versions that I think most of us prefer. This seems acceptable for street lights, which can often be 'blue or green-ish' (except for the Netherlands, where all the lights are quite orange! I've always wondered what the reason for that is, other than the obvious Orange symbollism...anyway, I digress).

The trick with installation is that you should ensure you have a 5.5mm drill bit (or the closest thing possible) and a power drill to bore the hole for the socket. Don't go too far, otherwise your drill will leave a bit of an impressions on your sidewalk, for example (ugh, also see my sidewalk around the 'socket' in my second-from-top photo)!

Unfortunately, I have to report that my experience has not been great. Of the 18 that I currently have or have had installed on the layout, 9 of them no longer work! The instructions imply that these lights should be used with the Brawa plugs, plate, and cables connected to a 12-16v power supply (the non-LED, non pin socket versions specify 14-16v AC for longest life, but no preference for AC or DC in the LED pin socket instructions is specified).


My connection is to an AC transformer with a max of 18VAC. Its likely that the max voltage was turned up one too many times and some of the LED's were fried (not not all of them, and the ones that went dark seem to do so individually). Additionally, the instructions state not to remove the lights with the power on. Yep, I've done that before. However, I've always noticed the the lights continued to work on those few times when I removed them from the socket with the power on. I've also noticed a curious decrease in the LED's brightness which I now recongize as an early sign that the light will soon fail altogether.

Its a mystery to me why I have a failure rate of 50%, which is clearly not acceptable! Something has to change! The Brawa fixtures look great, although I am adding in some Viessmann lights which look just as good with traditional bulbs. I am going to change my power supply, and because I like simple, clean, and easy to connect type of arrangements for wiring (just like with Unitrack), I will probably order the Brawa plates and plugs (I still have enough 4000, 4020, and others already installed and waiting to be installed to make this salvage effort worth it). If any reader with more electrical knowledge than me (which is near zero) has any suggestions that might help, I'd like to hear from you. Otherwise, at this point, I have to say this esteemed and high quality German manufacturer seems to have a great product concept, but it has been a disappointing experience for me (so far).

Friday, February 20, 2009

Locomotive Roster: BLS Class 485; Fleischmann 738601


This locomotive is one of my latest additions, in fact, it was a Christmas gift from my wife, and I believe she chose very well! This has been a very powerful little engine and is able to handle up to 32 of my cargo rolling stock cars without breaking a sweat (to include climbing a 2% grade!).

I am starting to notice a 'swiss' theme to my layout with the addition of this locomotive! Well, I have to admit, both my Class 450 Zurich S-Bahn locomotive set and the BLS locomotive and cars have some of the most impressive and dynamic color schemes of almost any railway in the world. The bright green on this locomotive is quite striking and complements the smooth contours of the locomotive nicely.

The paint and detail on this locomotive is fantastic and I truly believe that we must be in some sort of 'golden age' given the quality of N Scale locomotives these days.

My one comment on this locomotive is that installing the decoder in this engine was a bit of a trial. The NEM 651 standard socket and plug for 'plug and play' installation of decoders is genius, but this would not be model railroading if it was too easy!

This locomotive presents a challenge as you absolutely need to get a decoder with the wire harness. After initially taking off the shell and attempting to install a 'standard' 6-pin decoder, I found that once the decoder is installed it sits too high and you can't get the shell back on. Well, that won't do. I ended up ordering an ESU 52680 LokPilot micro with 6 pin plug and cable. I've used this decoder on my Thalys as well and for the price and quality, they are really quite nice.

This decoder was the solution, and as you can see from the photos, I show the side where the socket is for the 6-pins to be installed (and you'll notice the line where a decoder would stick up if you don't have a wire harness) and I also show the other side of the locomotive where Fleischmann (apparently) conveniently provided a space just large enough for a small decoder underneath an electrical bracket/contact (that can easily be slid out of the way to place the decoder in the recess). Hopefully the photos will help to show others how to do this as it was not clear from the instructions that this was how it should work.

A really nice locomotive from Fleischmann.

Sunday, February 8, 2009

Locomotive Roster: DB Class 323 (KoF II); Minitrix 12544


This is a TINY locomotive, it looks a lot larger in the photos and video than it is in real life! That the folks at Minitrix were able to not only fit the more, lights, but a DCC decoder into this little engine!

Of course, all of the meticulous engineering in the world cannot overcome one of the physical realities that a light, two-axle locomotive is challenged with...and that is that it really needs clean track and has no tolerance for non-powered switch frogs! Fortunately, I have all 'powered frogs' on my layout and the little engine worked marvelously with the Kato Unitrack. Ironically, I originally had a very small loop with Minitrix switches and Atlas flex track, but due to this engines absolute intolerance to run on this track (it would stall everytime it reached the non-powered frog of the Minitrix switch), I ended up replacing all of the track with Unitrack!


The LED's are not very bright, but I suppose that is the 'cost' one pays of attempting to put any sort of light in such a small space. This is minor, the big thing that I would be careful about for any potential operator is the question of how well, or not, this light, two axle locomotive will do on your track.
I am keeping this review short, as I feel like the photo and video (which is also short!) say it all! So for a very small locomotive, a very small review!

Friday, January 30, 2009

Locomotive Roster: SNCF BB 67300; Minitrix 12150


Currently my favorite locomotive! The appeal on this one is sort of funny for me. When I was first exposed to it in the 2007 Trix New Items catalog it did not really stand out (I thought at the time that it looked like a Winnebago!). But over time, the paint scheme started to appeal to me. Its certainly one of the more intriguing and dynamic paint schemes from any railway anywhere in the world.

I've now had this locomotive since June of 2008, and I am thoroughly pleased and impressed with its running characteristics, detail, and reliability. Installing a decoder into the NEM 651 socket was simple, quick, and problem free (by the way, this is a locomotive where there is room for the NEM 651 plug decoder without the wire harness).

This little locomotive can pull quite the load based on its relative size. I can attach nearly all of my 31 pieces of freight rolling stock and it can climb my 2% grade (on a curve!) without showing any obvious signs of slipping. Fantastic!

This is also a locomotive where the price was pretty good. In US dollars, I paid well below $200 last summer (remember the exchange rates back in the summer of 2008?) which is, generally speaking, a good 'value' from Minitrix (my context for this is my past experience with O Gauge, where $400 is typically the floor price and $500 or $600 for a decent model with digital capabilities!). Yes, compared to the domestic US locomotives, this was pricey, but I am not currently in that marketplace, so this seems okay to me (FYI, at current exchange rates, this should probably be around US$160).

In sum, a great looking and running locomotive --- and currently, the only representative from France on the layout! Enjoy the photos!

Friday, January 23, 2009

Locomotive Roster: SBB Class 450; Fleischmann 775301


This locomotive, and its matching cars, quickly became a favorite of mine. I had the good fortune to spend several days in the beautiful city of Zurich in 2007, and during my time at there this was one of the striking trains that I had the pleasure to see in person. I was very pleased to see that Fleischmann has produced not only the locomotive, but the matching double deck cars.

The locomotive feels very solid, and if this (along with the V100) are any indication of the type of quality that Fleischmann produces, then I am very impressed. It runs like a charm. It is a powerful and smooth runner, I am really not sure what else can be asked of these N scale locomotives.

This engine was also a textbook example of how easy it should be to install a decoder. Of course it comes with the wonderful NEM 651 socket, and a straight-out-of-the-box Lenz Gold Mini D fit perfectly and was easily programmed. No problems fitting, or having to go with a version with a wire harness, etc...

I did learn something about this locomotive. While the Class 450 was not my first Electric Loco (that was the Thalys), it was the first locomotive I had that power capable pantographs. When I first put it on the track, I could not get it to work. Before I panicked, I sent a quick mail off to the hobby ship where I purchased it and was pleased to get a quick reply to check the screw at the bottom of the locomotive that selects between track or catenary power. I checked and it was set to the pantograph and was no problem to fix! It does seem that the pantographs reach much higher than the Thalys (which has decorative, non-working pantographs) as this is the principal locomotive that I have to lower the pantographs when going under the Kato Elevated Station (see this post for more details on that).


Another observation. The double-deck matching passenger cars are on the long side, about 164mm long, which was a problem with the Kato Unitrack single track viaduct walls (see the same post). Interesting that the same set was the source of two 'incompatibilities' with some of my track and structures. However, these are completely minor inconveniences at best.


My sole complaint, and you can be the judge of this by looking at the photos, is the very weak LED lights in both the locomotive and the control cab passenger car. Not sure why Fleischmann selected to go with an arrangement that has such dim lighting, but it is sort of distracting and is my one disappointment. If I ever have the time and motivation, this is a prime candidate for an LED upgrade project!

Other than that, an excellent job by Fleischmann!

Sunday, January 18, 2009

Unitrack Obersten! (Unitrack Supreme!)


Kato's N Scale Unitrack system was, and continues to be, a very happy experience. I had a few bumps along the way (some of which were unique, but I share them in the interest of passing along my learning or mistakes) but this is one of the few investments I've made that I would do all over again. Is it right for you? That depends....

First, I doubt that I would have much interest in this hobby if not for the simplicity, functionality, and capabilities that Kato Unitrack provides. Yes, there is an obvious sacrifice in terms of prototypical realism, but there are ways around this (one of which I may attempt is to apply some 'rust' paint to the rails, and use diluted India ink on the plastic ballast which, according to other sources on the Internet, not only makes it more realistic but takes down some of the 'shine' of the ballast). For me, the ability to remove, add, and then continue to use the same piece of track after multiple revisions is a capability that makes up for the somewhat more pricey nature of this track and its subjective questionable prototypical appearance.

Second, while there are only two switches offered, a #4 and a #6, the fact that the switch motor is installed under the switch, thus removing either the unsightly switch machine sitting beside the turnout, and the excellent frog power capability and the great performance of these switches (i.e. no derailments) is another significant benefit of this track.

Third, the ability to connect, add power, and run trains and manipulate switches could not be easier. The fact that you can wire together a layout without touching a screw driver or stripping a single wire, is a feature that I love, although you still have the freedom to modify this as you wish.

And finally (at least for this post), since its more or less code 80, it is very compatible with Atlas, Minitrix, and other code 80 track (I've actually connected both Atlas and Minitrix track to Kato Unitrack without the need of their special adapter track and it works well...particularly for yard settings where the ballasted roadbed does not look correct).

Okay, so what are the cons? To be fair, these may not be 'cons' depending on your layout, pre-planning research, and rolling stock, and so on, but this is more a list of some of the 'issues' that I did find with Unitrack on my layout so far:

No Flex Track!!! Fleischmann has a similar ballasted roadbed track with a sort of 'flex track' piece, its really frustrating that there is no similar option for Unitrack. I did attempt (as mentioned above) to use transitions between Atlas flex track and the Unitrack, but while it worked satisfactorily, the appearance and commitment to matching the ballasting was more ambitious than I was ready for.


Curve Options. While Unitrack has many, many diameters to choose from, and the track system is extremely flexible in terms of combining curves, if you need to make minor realignments with your line, you are stuck. This is where flex track comes in very handy. I have an area of the layout where I need the tangent to move about 5mm or 1/4 inch, and there is just no suitable way to do this with Unitrack (that I know of).


Crossing (the 90 degree crossing).
My original track plan required a 90 degree crossover. However, I found that the crossover was not very reliable when it came to Rapido style couples and the flange on the couple would catch on the opposing rails, leading to derailments. I tried to determine if there was any way to file or modify the crossover to avoid this (or modify the couplers as a worse case) but ultimately revised the track plan to remove the crossover altogether.
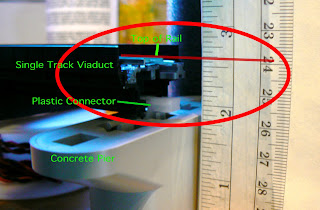

Beware of 2" Height Descriptions.
One of the biggest challenges I had to face was thinking that the 2" piers and so forth for the elevated track sections, are actually considerably higher once you add in the plastic supports. Beware if you are building your adjoining sections of the layout to viaducts and other elevated sections using the piers that your actual adjoining elevation will have to be higher. If you use the Piers (which are two inches in height) and the plastic attachments, the top of your rail to your base is between 2 9/16 and 2 5/8 in elevation. I can't fault Kato as they are not wrong, but it would have been helpful if their dimensions measured the top of rail to base distance!


Single Track Viaduct clearance problems.
The inside wall of the single track viaducts are too high to allow your longer passenger cars and rolling stock to go through. The problem is specifically with cars that are longer that 160mm, as I have a set with passenger cars that are 164mm which have problems on both the 282 and 315mm curves, however, my 161mm cars do not appear to touch the inside walls at any point. A very crude (and temporary) solution I had to apply was to sand down the inside walls with my belt sander. Still working on a better plan, possibly with a completely different approach to the elevated track in this area.
Overhead Station Clearance problems. Keep those pantographs down going through the Kato Overhead station! This may be a manufacturer specific only issue, but the pantographs on my Fleischmann electric will not clear the bottom of the Kato station. Since elevating the station is not a good option (the stairways that come with it would not fit right), you either need to install catenary that would push the pantograph down as it goes under the station, keep the pantographs down, or device a system to restrict the full extension of the pantographs on those models where this is an issue. I have noticed this is only a problem on those electric engines that have the capability to draw power from catenary. My Kato Thalys cannot do this, as the pantographs do not go high enough to encounter any obstruction from the station. The actual vertical distance from the bottom of the station to the base is just a hair under 2". However, once you add Kato Unitrack, the vertical clearance between the top of the rails and the bottom of the station is about 1 5/8.


All things considered, the issues I ran into are relatively minor compared to some of the problems I've had with 'traditional' track. I also have to say that I tried to use both Atlas and Minitrix switches on the layout originally, but due to persistent derailments or frog conductivity issues, they were all replaced (except for a couple of Minitrix switches in my mill yard).

Its a great system! It will be interesting to see what Atlas does with its new competitive version of this system. If the two systems are compatible, this could be good news for us N Scale modelers!

For more in depth help, tips, and deeper commentary on the Unitrack system, I recommend the Yahoo Unitrack group and Karayan's Unitrack page, which both contain multiple links to various resources as well. I also go into some more detail on some successful features of this system in this post, which I think articulates some of the unique advantages and capabilities of this system.

UPDATED:  I take a look at Kato's new "super-elevated" curve tracks at this post.

Friday, January 16, 2009

Locomotive Roster: DB Class 221; Minitrix 11120 (Set)


I've already mentioned that this locomotive (and its companion Class 03) in the Minitrix "Super Starter Digital Set" are good runners. It is, in my opinion, a good locomotive for the money (although if you're buying one of those larger starter sets, it really pays to shop around. Most websites were asking US $950 or so for this set, but I found a site where it was going for US $700). Trix (and other German manufacturers) all offer the same or similar versions of this locomotive, so I am sure there are better quality versions (and higher prices?) and plentiful supplies wherever you look!

As a modeller, in my mind, this locomotive is similar to the classic EMD F units in the States, if not in appearance, at least in terms of fondness of memory for German (and other) railfans.

I don't have any 'cons' with this locomotive. Its been a very consistent, reliable running engine, with great traction. Most of this is plastic (as compared to more premium versions that are more die-cast), it does not have LED lights, but it did come equipped with a decoder already installed.

I think that's all I have to say about this engine, enjoy the photos!