Showing posts with label UNITRACK. Show all posts

Thursday, December 10, 2009

Super-elevated curves and cant track from Kato and Tomix!


If there ever was a brilliant idea that- once you see it -you think "why didn't they think of this a long time ago?"  Well for me its got to be the new super-elevated curves (or 'cant' track as Tomix calls it) being put out now by both Kato (for Unitrack) and Tomix (for Finetrack).

Having once attempted to create this effect with traditional snap track (and quickly giving up in failure), I am so excited to see a good, easy to add system being produced!

So how do they look?  First, some comparisons:  From left to right below is the Kato 414/381 radius double-track, super-elevated curve (item 20-181); to the right of that (the second Thalys) is a traditional Kato 381 radius, to the right of that is the Tomix 391 radius, 'canted' (i.e. 'super-elevated), 'wide rail', single-track section of Finetrack (item # 1744); and just to the right of that (out of the picture) is another Relay Tsubame on another plain jane 381 radius):

I am super excited about how great they look!  Not sure how well it comes across in the photo, but even standing still it appears like the locomotives on the super-elevated track are actually moving compared to the traditional curves!

Here's another photo with a close up comparison of two Relay Tsubame's on curved track.  As above, the track on the left is the Tomix 'super-elevated' with a radius of 391, next to it is traditional Kato 381 radius:

Nothing I can say can do a better job than that photo!  So how does each system compare?

Here's a close up profile of the Unitrack Super-elevated curve:

As you can see, pretty apparent super-elevation!  As of this writing, Kato only produces a super-elevated curve in a double track version, which is a kind of bummer.  There is some news that they do plan on producing a single track version in the near future (no doubt prompted to do so by arch-rival Tomix!).

Below is a profile shot of the Tomix 'cant' track (or 'wide rail' or whatever....). 

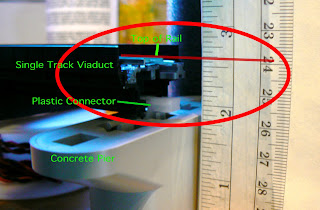
Again, pretty cool super-elevation on this!  Of course, if you're not using Tomix Finetrack, you'll notice that they have this unusual and proprietary 'connector' thing on one rail.  The Kato Unitrack adapters sections are actually made just for these Tomix track sections (Side note: a lot of folks, myself included, were under the impression that the Kato Unitrack 'adapter section' was for all non-Unitrack connections, but that's not true.  Kato Unitrack is pretty straight forward code 80 and you can easily connect Atlas code 80, Minitrix, and Fleischmann and probably others that I don't have).

Some observations on these curved tracks:
  • YOU WILL NEED THE EASEMENT SECTIONS for both the Unitrack and Finetrack super-elevated curves. The 'easement' sections are just what they sound like....traditional 'flat' on one end of the curve, which then 'eases' into the 'super-elevated'elevation on the other end.  Obviously, you connect your straight, non-super-elevated track to one end, and the super-elevated section to the other.  
  • "Short" easements and "long" super-elevated curves.  In other words, the 'easement' sections for both lines are 22.5 degrees, whereas the super-elevated curves are 45 degrees.  This limits some of the flexibility you might otherwise want if your actual radius is greater than the 381/391 or 414 that are offered. More on this below.
  • For whatever reason, both the Kato and Tomix versions are molded and painted to resemble concrete ties.  This is disappointing as it will 'stick out' when connected to traditional 'wood tie' track.  I have it in my mind to try and paint the ties, but that's something down the road when I've run out of interesting things to do.
  • And yes, the Tomix Finetrack curve is unusually wide.  Not really sure what they're planning...perhaps it has something to do with increasing stability, or maybe its just an asthetic requirement to be consistent with other pieces they are producing. The Kato double track version is consistent with their other double track pieces.
Below is a photo showing pieces from both systems which will better illustrate why your radius options are a little challenged with both company's products.  The track on the top is the Kato double track, and the track below that is the Tomix single track version:

The smaller sections on the bottom right of both company's super-elevated curve systems is the 'easement' track (or what Tomix calls the 'approach track') and is 22.5 degrees. The longer pieces are the fully super-elevated curves, which are 45 degrees- and do not get any smaller unless you take a hacksaw to them!  Obviously, if you JUST want a 90 degree radius curve, you'll have to make a compromise and use two easements on each side one 45 degree curve section.  This will reduce the impact of large sweeping (and super-elevated!) curves unfortunately.

You could do what I tried, which is to put two easements on the leading edge of the curves, add in the super-elevated pieces, and then plug some traditional straight pieces between the two super-elevated curves.  Not sure if I'll stick with this arrangement, but it is possible and I haven't had any problems, but I also don't think I'm gaining anything over what I proposed in the above paragraph.

As you can tell from the above photo, I have the Unitrack super-elevated curves/easements on my layout.  I haven't had a lot of running time the past several months, but when I have run trains across these curves, I have not noticed any problems at all.  So far, so good!   I have yet to install or run trains on the Tomix curves.  These will be used to replace some standard Kato viaduct pieces (single track) to create a much more interesting, sweeping, SUPER-ELEVATED bridge that will replace the somewhat boring set-up I have now (check back on this blog in several months and hopefully I'll have an update on that).

Yes, I'm 'sold' on super-elevated curves!  I'm hoping that these products are successful and we can begin to see more variations in the sizes that are offered in the future so I can 'upgrade' all those traditional curves!

Here's the breakdown on the part numbers from each company:

Tomix "Wide Rail" 'canted' Finetrack:

Easements: Tomix Item 1754 "Wide PC Approach Track"  CR(L)C391-22.5-WP(F)  - This package includes two 22.5 degree easement curves. 
Super-Elevated Curves:  Tomix Item 1744 "Wide PC Curved Track C391-45-WP(F) - Includes 2x 45 degree sections.

To complete a 'half circle' or 180 degree curve, you'll need the  'easement' or 'approach' package (2 x 22.5 = 45 degrees), plus 2 packages of the Curved track (you'll end up with an extra piece unfortunately since you only need three of these [ 3 x 45 = 135, + the 2 easements/approach tracks which add another 45 degrees; so 135+45  = 180]. degrees). If you want a fill circle of track, then you'll just add another package of Easements and one more package of curves - and no extras!


Also, I just noticed that if the 391 radius is too large for you,  Hobbysearch Japan also has a 354 mm radius version out now! 

Kato Unitrack 

Easements: Kato Item 20-182 "Concrete Tie Double-Track Superelevated Easement Curve Let, Right 414/381-22.5" Similar to Tomix, you get 2 22.5 degree pieces in this package.
Super-Elevated Curves:  Item 20-181 "Concrete Tie Double-Track Superelevated Curve 414/318-45".  The options for Kato are the same as Tomix above regarding how many packages of each you'll need.

Also, Kato has the same curves in a double track viaduct configuration as well.  I've also heard that there's a smaller radius version of the double-track super-elevated  curves, but I haven't seen it.

Thursday, September 24, 2009

Fleischmann, Tomix, and Kato Roadbed Track


Most of my layout is Kato Unitrack, but through the purchase of various starter sets or unique track capabilities, I've got a little bit of track from Tomix (primarily for their tight radius Tram system), Fleischmann Profitrack (that came with a starter set, but also for some excellent flex track), Minitrix and Atlas.

I thought it might be interesting to provide a few photo comparisons of two of those track systems that have roadbed that are not real well known in the US; Tomix Finetrack and Fleischmann's Profitrack. For reference, I'll also add in a piece of Unitrack (There are two other track systems in N Scale that I am aware of...the new Atlas track system [forgot the name] and the Bachmann EZ Track system)!

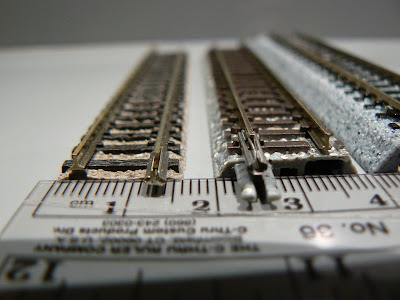
The photo at top shows, from left to right, the Fleischmann Profitrack, the Tomix Fine Track, and the Unitrack. Below is a close up of the Fleischmann and Tomix tracks:

As you can see, the Fleischmann is the narrowest, at just about 16mm, Tomix is a bit wider at 18mm, while the Kato Unitrack appears to be a hefty 25mm in comparison!

While they are all Code 80 - and thank goodness for that! - its fairly obvious that they will need a little effort to get to work together. Tomix, interestingly enough, seems to put its rail joiners on the opposite side of other manufacturers, and with that 'cast in' connector on the Tomix roadbed, some sort of modification (or a Kato Unitrack joiner for this purpose) is necessary.

A final shot below shows a side view....nothing spectacular here, except they all obviously work off different geometries (so you'll have to do some tricks to get them to work together somehow). While I have definite plans to use Finetrack for a tram system in my downtown remodel (103mm radius curves and accessories to make it look like rails in the street...although Kato appears to be right behind them!), Tomix is also coming out with a single track super-elevated curve! That will be cool and will require some big changes to my layout - but super-elevated curves are worth it!

I also have additional plans for the Fleischmann track...given its relative elevation to Unitrack, this would be great track for yards...although the cost of switches with motors in their system is crazy (E.g.: when it makes the Kato #4 switch look like a real value...its too much!).


UPDATE 5 December 2009:

Mel in the comments section is building a layout for his Grandson, and had a question about whether or not an adapter is needed for the Fleischmann track with either Atlas (code 80) or Minitrix track.  Its a good question, and I expect other people will wonder as well!

Here's a couple of photo's of the three types: The first is the Minitrix track connected to the Fleischmann profitrack with just the standard rail joiners from each company:


 While its not perfect, I don't know if any sort of adapter would help.  Below is the Atlas code 80 track and Fleischmann:

The Atlas track as well works nicely with the Fleischmann track.  The Fleischmann track is hair taller, but this can easily be addressed by a very thin shim.   If it were me, I would not worry about an adapter.  I recall reading somewhere that Trix does make an adapter, but I think this was for another track system (Rapido?) that I don't use.

Good luck on your layout project! 

Monday, May 18, 2009

Layout Version 2 Overview

I talk about my final selection of RailModeller to help me design (and redesign) my layout in this post here.   In this post, I'll share with you the 'plan' and an overview of the layout.  Below is the current plan.   The 'grey areas' are elevated sections (about 2" high).  The three main colors represent three seperate lines (red and pink are the same line, but the red color is 'pink' where its elevated, if that makes sense!).
So here is a break down of my three lines, with some photos to give some perspective on where they are on my layout.

THE THREE LINES AND COLOR CODES:


RED LINE:

The "Red" Line is the main line. This is the line with two 2% grade (using Woodland Scenics grade risers); one goes up...the other brings it 'down'.    I colored the actual grade sections in a sort of 'orange/peach' color. The elevated portion of the main line is in 'pink', while the bottom level is 'red'. The idea was to change the colors as the elevation rose.  The below photo shows the Relay Tsubame on one of the two 'main line' tracks that makes sort of a siding on the bottom level as the main line comes down the grade.  The elevated section of this same line is the track closest to the camera on the bridge in the background.
On the other side of the layout from the yard, is a long stretch of track using Woodlands Scenics 2% grade risers to get an elevation of a little over 2 inches.
After coming off the grade shown above, the main line enters some single track Kato viaducts where it curves around and crosses over the main line and the "green line".  From here it continues to where the viaduct is seen in the background in the above photo with the yard.

BLUE LINE:

The "Blue Line" is the 'suburban' line. This line is on the higher level. Its just a basic 'dog-bonish' loop that runs inside the main line on the elevated section of the layout. Unfortunately, some of the double track sections are in red when they should be blue (see above). The three cool features on this line are an extra long siding (part of an abandoned plan that would have included another inside loop!);
 the Suburban station (in...uh...my 'downtown'),
 and the rock cliffs:

GREEN LINE:

The "Green Line" is sort of the 'country' line. It runs on the 'ground' level, and spends most of its time meandering under bridges....
 and through a relatively long tunnel on the top right that is hidden by a long piece of sintra that has trees and ground cover on it. The picture below shows the tunnel area with the cover removed:

GREY AREAS
The 'grey areas' are yards or industrial sidings.


While most of the yards and track are Kato Unitrack, there is a small industrial spur that comes off the blue line on the elevated section. This is mostly Minitrix track and switches.
And finally, there is a small loop on the left side of the layout that comes off the 'Green Line' and sits at the 'ground level', which I did not add to the plan. This loop will likely be removed and replaced with one end of a point to point trolley line I am thinking about adding.

Friday, May 15, 2009

Layout Design Software


Well, its been a few weeks since my last post. The nice weather will no doubt take some time away from trains over the next few months, but I've still got plenty of projects to keep my busy.

One of those projects has been getting a new 'digital' recreation of my layout built on my Mac - so I can play around with some ideas for the layout that have been in my head.

Since I really wanted a track layout design program that was Mac OS X native, that limited my choices. I looked at Xtrakcad (and found it difficult to use on my PC), I've used RRTrack in the past (which was okay), looked at WIntrack (no Tomix library) but none of these had either the ease of use or Mac compatibility that I was looking for.

I finally ended up going with RailModeller. Despite its biggest drawback (no elevations or grades!), it works great on my Mac, has an easy interface, and very nice looking schematics.

An initial result of my RaiModeller efforts is the image posted above, which is my current layout (and what I refer to as 'Version 2') To see a bigger image of the trackplan/layout, click it and it will open at a large size.

RailModeller was easy to use (but my advice is before you buy, check out their free demo). However, some of the product descriptions were still in German (the Fleischmann and Tomix libraries are two examples) and -not sure if its me or the program- but there are places where the actual track I have on the layout just won't fit (keep in mind, I did this backwards. As the layout is done, I had to check the track on my layout then entered it into the design program). This forced me to take some creative license in some areas and, for example, leave out a 64mm straight, add a 29mm straight, and so forth (for the most part, the issue was in the lengths of the straight track areas, all the curves worked out fine!). So the image is not exactly what's on my layout (it may, in fact, be better!), but close enough....

One easy to use and useful feature is the 'color' changing feature. Unfortunately, it will only let you select one color per piece, so if you have Kato double-track sections, they will be one color when you may want to have separate colors for each track (I am sure there is a way around this in the Rail Editor program that comes with it, but that's a whole other project I don't want to get into right now).


That is pretty much it...to compare my track plan to the real layout....see this post!

Tuesday, March 31, 2009

Flex Track with Roadbed (Unitrack Solution?)

Fleischmann's Flex Track?

My Kato Unitrack has been fantastic and I have no complaints, however, there does seem to be some items that I (and others) would really like to see Kato produce for its track system. Curved turnouts would be very nice to have, but even more useful would be flex track!

Since I'm not holding my breath waiting for Kato to produce flextrack (considering that Unitrack appears to have been a track system primarily designed for temporary layouts, where flex track is neither necessary or practical), I've been trying to find some solution, particularly for one area where I need the two parallel lines coming off of a double track bridge to separate about a half inch. The photo shown at right illustrates the poor looking 'angle' that the straight pieces' take to make the 1/2 inch or so diversion (there are not radii that would permit this). It may not look that bad in the photo, but when you see it in person, it looks terrible.

Atlas' flex track is ubiquitous, but wasn't my favorite option. I had noticed that Fleischmann makes a track with roadbed in it, which they call 'profi-track', which features a 777mm section of flex track (with roadbed)! The photo at the top of this post shows (from left to right) a typical Unitrack section, a Fleischmann straight section, the Fleischmann flex track, and then the underside of the flex track.

I took a short trip up to Canada this weekend, stopped in at Euro Rail Hobbies, and got a couple of sections of this track. The one thing that stands out about the Fleischmann profi track (as opposed to Kato, Bachmann Easy Track, and I think the new Atlas system with roadbed and even the Tomix system?) is that the roadbed feels more like 'rubber' than plastic. Not sure if its the same material in the standard rigid sections as it is in the flex track, but the flex track definitely has a very 'rubbery' feel to it.

This has the unusual (at least it seems to me) attribute for flex track in that it actually can hold a curve without having to be affixed to anything. See photo at right where I bent the track, set it down, and - wallah! - it nearly holds the curve I created. Very cool.

In profile against the Unitrack (again, see photo at right), their are some substantial differences. However, they are both code 80, so the differences can be 'covered up' with some creative scenery work so that the differences in the roadbed base can be covered up.

The only thing I had to do with the track to get a standard rail joiner (I used some surplus Atlas rail joiners and removed the Uni-joinders) is carefully cut the first set of 'spikes' on each end holding the rail to the ties. After that, the rail joiners were able to slide on. Note that the Atlas rail joiners slide onto Kato's rails a bit too easy, and little pressure with the pliers helps them to get a stronger contact.

Replacement of the section of Unitrack with the flex track was surprisingly easy. I'll need to do a little scenery and ballast work to complete the job, but all in all, this was about the best solution I've found for the gap in Kato's Unitrack library. I have to say, I have not read or heard much about this track system either online or in print, and if 'track is track' pretty much anywhere you look, this Fleischmann track is very nice, high quality product, that is not priced too badly!

Not sure if its obvious, but compare the photo at right with the new Fleischmann flex track, and its smooth curves, versus the rather unsightly angle that the Kato track made in the photo at the top.

One other very interesting thing about this track....it is QUIET! The density of the rubber roadbed really absorbs sound. If that's a consideration for you, this track system may be an interesting alternative to more popular choices.


UPDATED: Photo comparing Unitrack to ProfiTrack:


CaptOblivious from Akihabara Station wanted a bit more on the tie spacing on the Fleischmann Profi track. The differences are obvious, but with some creative ballast work, I think I'll get the distinctions to look less obvious once I've fully scenic-ed this section.

Monday, March 30, 2009

N Scale Layout construction overview

Now that most of the scenery and all the major construction is complete, I thought I would create one post that sort of summarized, in an appropriate chronological order, the steps I took to build and create my N Scale layout.

1. The Plan. As everyone who has ever contemplated building a layout has confronted, there are many questions and decisions to be made about your layout plan, all of which are constrained by the physical space you have to build a layout and whether or not the layout will need to be somewhat portable, temporary, or permanent. The below posts share some of my experiences with my first layout, which was essentially two ovals with a couple of sidings. The third post talks about the new plan, of which most posts on this blog are focused on.
My current track plan and the software I used.
My original, single 'hollow core' door N Scale layout
Thoughts and perspective on my first layout, and what I wanted to improve. Maybe some similar things your are thinking about, and how my thinking evolved.
The expansion from a single hollow core door to a 'double door' layout.


2. Where to put the layout. This is really about the physical constraints or the location where your layout will be located. My layout is located in an extra stall in my garage, but the plan and solution for the table -which needed to be both semi-portable and adjustable to adapt to the sloping elevation of a garage floor- are as suitable for an indoor room or basement layout. Mostly, this is about the benchwork I created to support and keep level a hollow core door layout using two doors.

3. Putting the layout foundation together. Once you have a plan (and the track to create that plan), and a suitably level 'table area' to start your layout, its time to start adding all that track and scenery.
•My approach, based on some less than desirable past experiences, keeps the track away from all the messy glue and landscaping material and takes advantage of the Unitrack track system by Kato to ensure flawless track operations.
•I also provide some general thoughts on my Kato Unitrack experience here, which might be helpful in your planning process.
•Some thoughts on the connectors used in the Kato Unitrack track system here if you are thinking of finding similar connectors to make the other electrical connections on your layout similarly 'plug and play' as the Kato connectors.

4. Scenery. I found the scenery process for this layout one of the most enjoyable parts of it, which surprised me. The reason for this was I removed all the track (mostly) from the layout for this process (see this post if you missed my strategy on this) which allowed me to go to town using all sorts of techniques without worrying about gumming up pricey switches!
• Adding rocks. If your plan considers some sort of mountainsides, the time to add rocks is before any grass or foliage is applied. My approach was the standard 'Woodland Scenics' process.
• Adding grass. I 'discovered' a method of applying the standard grass flocking material that was much more satisfying than other methods. The quick explanation is combining white glue and acrylic paints, then sprinkle on your flocking material. You get a good base color and solidly adhered flocking material without having to spray a ton of dilated glue mixture everywhere.

• Adding foliage. "Foliage" is a type of meshed ground cover that is more commonly used in layout scenery in Europe, but using the above technique I found great results with this type of product.
• Miscellaneous. Do you have need for a bridge that does not have any sort of commercially available solution? Build your own!

5. Put the track down and run trains! Again, since I did all the scenery without the track on the layout, this was the fun part!

Saturday, February 28, 2009

Unitrack Connectors


I'm planning on implementing a "BCD" circuit which will allow me to use standard SPDT toggles along with a lighted control panel and signals next to the track (using standard bi-color LED's on the control panel and yet to be decided signals on the layout). The idea is that I'll have a control panel with lighted indicators as to switch position, as well as some signaling showing the direction of the turnout on the layout itself. Pretty excited to get this going, as I've decided that the standard Kato 'blue' toggles really don't work well for more complicated track plans. If you want more information on the wiring necessary to do something like this, the plan idea comes from one of the members of the Yahoo! Unitrack forum. I must say, he's been a great help for me in educating me on how to wire these circuits.

Anyway, As I've begun to educate myself on how this will be wired, I also decided that I wanted to build this circuit with as much of the original 'plug and play' capabilities of the Kato Unitrack system as possible. The biggest obstacle is getting more of the Unitrack connectors (affordably...without having to cannibalize any Kato products).

I've found a great article by a gentleman named Randall Roberts on About.com that talks about some of the design of the Unitrack connectors at a level of detail I've not seen anywhere. This may be old news to some of you (and irrelevant to others!) but I did not know that the Unitrack "male" and "female" connectors are actually reversed! Yes, the connector that appears to be the female actually has male pins inside of it, and the same is true for the connector that appears to be the male connector (female pins inside).

And as I went about shopping/searching for the connectors which I will need to attach to the switch machines (the switch machines have the outward looking male connectors, which require what appear to be the female connector, but actually contain the male pins inside), it seems like various vendors (most of them in the R/C field) contradict each other as well.

I did find a really good price on the connectors I was looking for at all-battery.com at US $1.39 each, which is a lot cheaper than buying the the Kato cords! I had to get them with 18 gauge wire vs. the Kato connector standard 22 gauge, but I don't think that will be an issue.

There are other Tamiya connectors out there that LOOK like Kato connectors, but they are a different size (for Unitrack compatibility, what you want is the MINI-Tamiya connectors). I've ordered them to use with building lighting and so forth, which have been designed to run on a separate 12v DC power source. The photo at the top of this post shows the apparent similarity in appearance, but the significant difference in size (the smaller version is the Kato Unitrack plug)! Again, I like the plug and play capabilities of these connectors, and the fact that there are similar, but incompatible types of plugs allows me to easily configure my electrical needs without having to do extensive labeling.

UPDATE (5 Jan 2010):
I've discoverd that the Tamiya connectors do not fit correctly with the Kato Unitrack 3-Way Extension cord (24-827).  The electric conducting plugs and sockets are fine, but it seems the white plastic sockets on the 3-way is not long enough to allow the Tamiya connectors to go on all the way.  I assume that if you modified or trimmed the white plastic on the Tamiya connectors a bit they will slide all the way on, but I haven't tried this yet.  I will provide another update on this once I've tested it.

Tuesday, February 3, 2009

Track Cleaning Solution? The NO-OX test


I came across a very provocative promise in the forums at NScale.org. One of the forum posters was making some fantastic claims about track cleaning. The basic claim being that he doesn't have to clean his track, and hasn't in four years, given the application of a type of gel (he pointedly states it is not a grease) to his rails called "NO-OX-ID “A SPECIAL”" .

This is quite a claim, and cleaning the track is probably (for all of us I'm sure) one of the least interesting aspects of this hobby. If it is true that applying this...gel..can indeed reduce the amount of cleaning that is necessary, then I am all for it!

I found a tube of this stuff on eBay. It was very cheap, and the tube is very large! I certainly have enough to last a lifetime!

Of course, track cleaning is also a highly debated topic! I am willing to try anything that does not harm the locomotives, track, take too much work, or harm my health! Of course, one has to be skeptical of a 'grease that is not a grease' and its promise that it can take away the pain of track cleaning, so I've decided to conduct a test.

The test I have set up is really simple. On my layout I have 4 independent loops (well, 5 actually, counting a very small circle for my son to run loco's in conventional mode), I decided to apply NO-OX to the inner loop on my upper level, but no where else. I expect that since all of the track on the layout will be subject to the same environment, conditions, rolling stock, etc... and the track is all about the same age (and primarily all Unitrack) then this will be a pretty fair test of the NO-OX results.

I applied it following the specific instructions that were posted on the forum. Given the risk of applying a 'grease' (yes, yes, not supposed to call it that but, "looks like a duck....etc...") I was absolutely to the letter of those instructions. I think the most important part is do NOT be tempted to apply too much. Fortunately, I didn't. And when I got to the later part of the process (where your wiping off even the small traces you put on) and running locos that, yes, are slipping pitifully, I am glad I did not over do it.

The NO-OX has now been on the layout for about a month. Let's pick early January 2009 as the 'start' date of this little test. So far, I have not had to do any cleaning on any of the track yet, so nothing to report. I will update this post the first time I find that my track is in a state where it requires cleaning and provide some comparisons.

Sunday, January 18, 2009

Unitrack Obersten! (Unitrack Supreme!)


Kato's N Scale Unitrack system was, and continues to be, a very happy experience. I had a few bumps along the way (some of which were unique, but I share them in the interest of passing along my learning or mistakes) but this is one of the few investments I've made that I would do all over again. Is it right for you? That depends....

First, I doubt that I would have much interest in this hobby if not for the simplicity, functionality, and capabilities that Kato Unitrack provides. Yes, there is an obvious sacrifice in terms of prototypical realism, but there are ways around this (one of which I may attempt is to apply some 'rust' paint to the rails, and use diluted India ink on the plastic ballast which, according to other sources on the Internet, not only makes it more realistic but takes down some of the 'shine' of the ballast). For me, the ability to remove, add, and then continue to use the same piece of track after multiple revisions is a capability that makes up for the somewhat more pricey nature of this track and its subjective questionable prototypical appearance.

Second, while there are only two switches offered, a #4 and a #6, the fact that the switch motor is installed under the switch, thus removing either the unsightly switch machine sitting beside the turnout, and the excellent frog power capability and the great performance of these switches (i.e. no derailments) is another significant benefit of this track.

Third, the ability to connect, add power, and run trains and manipulate switches could not be easier. The fact that you can wire together a layout without touching a screw driver or stripping a single wire, is a feature that I love, although you still have the freedom to modify this as you wish.

And finally (at least for this post), since its more or less code 80, it is very compatible with Atlas, Minitrix, and other code 80 track (I've actually connected both Atlas and Minitrix track to Kato Unitrack without the need of their special adapter track and it works well...particularly for yard settings where the ballasted roadbed does not look correct).

Okay, so what are the cons? To be fair, these may not be 'cons' depending on your layout, pre-planning research, and rolling stock, and so on, but this is more a list of some of the 'issues' that I did find with Unitrack on my layout so far:

No Flex Track!!! Fleischmann has a similar ballasted roadbed track with a sort of 'flex track' piece, its really frustrating that there is no similar option for Unitrack. I did attempt (as mentioned above) to use transitions between Atlas flex track and the Unitrack, but while it worked satisfactorily, the appearance and commitment to matching the ballasting was more ambitious than I was ready for.


Curve Options. While Unitrack has many, many diameters to choose from, and the track system is extremely flexible in terms of combining curves, if you need to make minor realignments with your line, you are stuck. This is where flex track comes in very handy. I have an area of the layout where I need the tangent to move about 5mm or 1/4 inch, and there is just no suitable way to do this with Unitrack (that I know of).


Crossing (the 90 degree crossing).
My original track plan required a 90 degree crossover. However, I found that the crossover was not very reliable when it came to Rapido style couples and the flange on the couple would catch on the opposing rails, leading to derailments. I tried to determine if there was any way to file or modify the crossover to avoid this (or modify the couplers as a worse case) but ultimately revised the track plan to remove the crossover altogether.


Beware of 2" Height Descriptions.
One of the biggest challenges I had to face was thinking that the 2" piers and so forth for the elevated track sections, are actually considerably higher once you add in the plastic supports. Beware if you are building your adjoining sections of the layout to viaducts and other elevated sections using the piers that your actual adjoining elevation will have to be higher. If you use the Piers (which are two inches in height) and the plastic attachments, the top of your rail to your base is between 2 9/16 and 2 5/8 in elevation. I can't fault Kato as they are not wrong, but it would have been helpful if their dimensions measured the top of rail to base distance!


Single Track Viaduct clearance problems.
The inside wall of the single track viaducts are too high to allow your longer passenger cars and rolling stock to go through. The problem is specifically with cars that are longer that 160mm, as I have a set with passenger cars that are 164mm which have problems on both the 282 and 315mm curves, however, my 161mm cars do not appear to touch the inside walls at any point. A very crude (and temporary) solution I had to apply was to sand down the inside walls with my belt sander. Still working on a better plan, possibly with a completely different approach to the elevated track in this area.
Overhead Station Clearance problems. Keep those pantographs down going through the Kato Overhead station! This may be a manufacturer specific only issue, but the pantographs on my Fleischmann electric will not clear the bottom of the Kato station. Since elevating the station is not a good option (the stairways that come with it would not fit right), you either need to install catenary that would push the pantograph down as it goes under the station, keep the pantographs down, or device a system to restrict the full extension of the pantographs on those models where this is an issue. I have noticed this is only a problem on those electric engines that have the capability to draw power from catenary. My Kato Thalys cannot do this, as the pantographs do not go high enough to encounter any obstruction from the station. The actual vertical distance from the bottom of the station to the base is just a hair under 2". However, once you add Kato Unitrack, the vertical clearance between the top of the rails and the bottom of the station is about 1 5/8.


All things considered, the issues I ran into are relatively minor compared to some of the problems I've had with 'traditional' track. I also have to say that I tried to use both Atlas and Minitrix switches on the layout originally, but due to persistent derailments or frog conductivity issues, they were all replaced (except for a couple of Minitrix switches in my mill yard).

Its a great system! It will be interesting to see what Atlas does with its new competitive version of this system. If the two systems are compatible, this could be good news for us N Scale modelers!

For more in depth help, tips, and deeper commentary on the Unitrack system, I recommend the Yahoo Unitrack group and Karayan's Unitrack page, which both contain multiple links to various resources as well. I also go into some more detail on some successful features of this system in this post, which I think articulates some of the unique advantages and capabilities of this system.

UPDATED:  I take a look at Kato's new "super-elevated" curve tracks at this post.