Showing posts with label TOMIX. Show all posts

Thursday, December 10, 2009

Super-elevated curves and cant track from Kato and Tomix!


If there ever was a brilliant idea that- once you see it -you think "why didn't they think of this a long time ago?"  Well for me its got to be the new super-elevated curves (or 'cant' track as Tomix calls it) being put out now by both Kato (for Unitrack) and Tomix (for Finetrack).

Having once attempted to create this effect with traditional snap track (and quickly giving up in failure), I am so excited to see a good, easy to add system being produced!

So how do they look?  First, some comparisons:  From left to right below is the Kato 414/381 radius double-track, super-elevated curve (item 20-181); to the right of that (the second Thalys) is a traditional Kato 381 radius, to the right of that is the Tomix 391 radius, 'canted' (i.e. 'super-elevated), 'wide rail', single-track section of Finetrack (item # 1744); and just to the right of that (out of the picture) is another Relay Tsubame on another plain jane 381 radius):

I am super excited about how great they look!  Not sure how well it comes across in the photo, but even standing still it appears like the locomotives on the super-elevated track are actually moving compared to the traditional curves!

Here's another photo with a close up comparison of two Relay Tsubame's on curved track.  As above, the track on the left is the Tomix 'super-elevated' with a radius of 391, next to it is traditional Kato 381 radius:

Nothing I can say can do a better job than that photo!  So how does each system compare?

Here's a close up profile of the Unitrack Super-elevated curve:

As you can see, pretty apparent super-elevation!  As of this writing, Kato only produces a super-elevated curve in a double track version, which is a kind of bummer.  There is some news that they do plan on producing a single track version in the near future (no doubt prompted to do so by arch-rival Tomix!).

Below is a profile shot of the Tomix 'cant' track (or 'wide rail' or whatever....). 

Again, pretty cool super-elevation on this!  Of course, if you're not using Tomix Finetrack, you'll notice that they have this unusual and proprietary 'connector' thing on one rail.  The Kato Unitrack adapters sections are actually made just for these Tomix track sections (Side note: a lot of folks, myself included, were under the impression that the Kato Unitrack 'adapter section' was for all non-Unitrack connections, but that's not true.  Kato Unitrack is pretty straight forward code 80 and you can easily connect Atlas code 80, Minitrix, and Fleischmann and probably others that I don't have).

Some observations on these curved tracks:
  • YOU WILL NEED THE EASEMENT SECTIONS for both the Unitrack and Finetrack super-elevated curves. The 'easement' sections are just what they sound like....traditional 'flat' on one end of the curve, which then 'eases' into the 'super-elevated'elevation on the other end.  Obviously, you connect your straight, non-super-elevated track to one end, and the super-elevated section to the other.  
  • "Short" easements and "long" super-elevated curves.  In other words, the 'easement' sections for both lines are 22.5 degrees, whereas the super-elevated curves are 45 degrees.  This limits some of the flexibility you might otherwise want if your actual radius is greater than the 381/391 or 414 that are offered. More on this below.
  • For whatever reason, both the Kato and Tomix versions are molded and painted to resemble concrete ties.  This is disappointing as it will 'stick out' when connected to traditional 'wood tie' track.  I have it in my mind to try and paint the ties, but that's something down the road when I've run out of interesting things to do.
  • And yes, the Tomix Finetrack curve is unusually wide.  Not really sure what they're planning...perhaps it has something to do with increasing stability, or maybe its just an asthetic requirement to be consistent with other pieces they are producing. The Kato double track version is consistent with their other double track pieces.
Below is a photo showing pieces from both systems which will better illustrate why your radius options are a little challenged with both company's products.  The track on the top is the Kato double track, and the track below that is the Tomix single track version:

The smaller sections on the bottom right of both company's super-elevated curve systems is the 'easement' track (or what Tomix calls the 'approach track') and is 22.5 degrees. The longer pieces are the fully super-elevated curves, which are 45 degrees- and do not get any smaller unless you take a hacksaw to them!  Obviously, if you JUST want a 90 degree radius curve, you'll have to make a compromise and use two easements on each side one 45 degree curve section.  This will reduce the impact of large sweeping (and super-elevated!) curves unfortunately.

You could do what I tried, which is to put two easements on the leading edge of the curves, add in the super-elevated pieces, and then plug some traditional straight pieces between the two super-elevated curves.  Not sure if I'll stick with this arrangement, but it is possible and I haven't had any problems, but I also don't think I'm gaining anything over what I proposed in the above paragraph.

As you can tell from the above photo, I have the Unitrack super-elevated curves/easements on my layout.  I haven't had a lot of running time the past several months, but when I have run trains across these curves, I have not noticed any problems at all.  So far, so good!   I have yet to install or run trains on the Tomix curves.  These will be used to replace some standard Kato viaduct pieces (single track) to create a much more interesting, sweeping, SUPER-ELEVATED bridge that will replace the somewhat boring set-up I have now (check back on this blog in several months and hopefully I'll have an update on that).

Yes, I'm 'sold' on super-elevated curves!  I'm hoping that these products are successful and we can begin to see more variations in the sizes that are offered in the future so I can 'upgrade' all those traditional curves!

Here's the breakdown on the part numbers from each company:

Tomix "Wide Rail" 'canted' Finetrack:

Easements: Tomix Item 1754 "Wide PC Approach Track"  CR(L)C391-22.5-WP(F)  - This package includes two 22.5 degree easement curves. 
Super-Elevated Curves:  Tomix Item 1744 "Wide PC Curved Track C391-45-WP(F) - Includes 2x 45 degree sections.

To complete a 'half circle' or 180 degree curve, you'll need the  'easement' or 'approach' package (2 x 22.5 = 45 degrees), plus 2 packages of the Curved track (you'll end up with an extra piece unfortunately since you only need three of these [ 3 x 45 = 135, + the 2 easements/approach tracks which add another 45 degrees; so 135+45  = 180]. degrees). If you want a fill circle of track, then you'll just add another package of Easements and one more package of curves - and no extras!


Also, I just noticed that if the 391 radius is too large for you,  Hobbysearch Japan also has a 354 mm radius version out now! 

Kato Unitrack 

Easements: Kato Item 20-182 "Concrete Tie Double-Track Superelevated Easement Curve Let, Right 414/381-22.5" Similar to Tomix, you get 2 22.5 degree pieces in this package.
Super-Elevated Curves:  Item 20-181 "Concrete Tie Double-Track Superelevated Curve 414/318-45".  The options for Kato are the same as Tomix above regarding how many packages of each you'll need.

Also, Kato has the same curves in a double track viaduct configuration as well.  I've also heard that there's a smaller radius version of the double-track super-elevated  curves, but I haven't seen it.

Saturday, November 28, 2009

Tomytec and Tomix buildings

Well, after the 19 or so stories of the "Godzilla Corporation's" high-rise office complex, time for a break with some smaller, gap-filling structures.

Way back in February I blogged about how fun the Tomytec building collection ('The Town (Machinami) Collection No.7' to be exact) was. Although the quality isn't great (more on that below), the relative value and diversity of building types is very intriguing for anyone looking for something a little different in their N Scale structures. Plus, they're a lot of fun.

I've done a couple of minor modification to a couple of these, I blogged about the KFC 'conversion' already, and below is a photo of a Chinese restaurant with relatively minor changes.


This was an easy three or four LED modification, with a 'homemade' Peking Garden sign (backlit with LED's) over the front.

You can also make out some of the 'quality' issues with this series in that photo, and its really to be expected.  The walls, floors, etc.... are somewhat warped, and the method that is used to assemble them (which is really just sliding tabs into grooves and held there by friction) tends to result in less than flush corners and joints.  This is not a design problem for Tomytec, as it appears these are aimed for more of a toy-like collector than serious modelers.  In truth, this doesn't bother me much, and there's some things you can do as a modeler to address these issues that are pretty simple.

On the other hand, the amount of screen printing or painting that goes into each one of these models is very much surprising compared to the standard fare seen in most 'serious' kits, and I've yet to actual repaint one of these Tomytec models as their colors and detailing actually work quite well (particularly for 'fill areas' in my city that won't be highly visible).  I should also mention that you get a little packet of 'detail parts' with virtually every building as well, including stairs, signage for the roof, and other various pieces that are made to snap into various holes placed in the roof, floors, walls, etc....

One thing that doesn't look right about the above picture? Well, if its going to be in a 'city', then its not going to sit all alone without some neighbors next to it! And that, my friends, is one way of addressing the 'warped walls'.

The next project combines three of the TomyTec buildings, removes all the walls (in fact, the center building is actually a corner building that has a triangular footprint) and leaves nothing except the storefronts (only one of which was modified from a very 'traditional' looking Japanese storefront, to a more modern plate glass sort of front).

The following photos show these buildings in the middle of construction prior to the lighting and final 'details':


The building with the clear plastic 'front' is going to end up as a 'bank', the middle building stays untouched (I like the "Fuji Grill" name and graphics too much), while the corner building on the end, with a sort of stucco exterior, gets some crazy color-changing LED's (a nightclub perhaps? not sure what the Japanese characters on it say the building is, but I think a shady little club in the city will work!).


From the 'other side' of the block:

Yes, that brick building on the far left is not part of the Tomytec collection, but I think it looks like it would fit right into this neighborhood.  I think this will make an interesting little area of my city...after the cold, serious 'high rises', this will look like that block not too far off where things are just a little bit edgier!

One other recent project has been the Tomix 4048 'bow front building' conversion to a hotel.  This was relatively easy, but took me forever due to distractions from other projects.  I originally came across this building on Scaper's impressive Flickr site, and knew that I had to have one.  I used two kits, and tried to use the extra ground floor as a 'normal floor' (albeit with high ceilings), to pull this off, I added a strip of styrene in the doorway gap, some clear plastic for the window, and hopefully pull of something that looks like it could be a 4th floor ballroom or something.
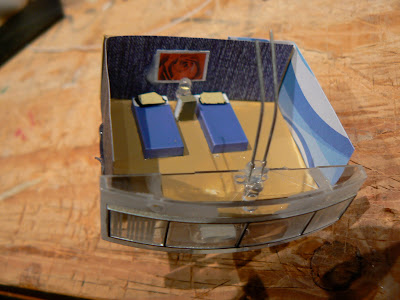
I also went a bit overboard and added some interior detail.  I made two 'beds' out of various plastic parts, used scrap paper for wallpaper, and added an  LED for a table lamp (in addition to a third LED that is right above the window shooting down) and of course, a figure doing something.

By the way, its important to get a light source as near to the window as possible (you can see my LED in place below, which did require some milling of the frame above it when I put it together), if you place a light near the 'back' of all your detail, it puts all your detail work in shadow, thus losing a lot of the value of doing this sort of work in the first place.


Here's a shot of the final 'room' with the lady standing there.

Arghh... yes, there's still an unslightly gap there between the building sections (still not done).  And a final shot of the building just prior to its getting its signage (the "Mercuit Hotel"....a name my daughter came up with that means nothing at all!).


The ground floor has some basic 'hotel registration' detail as well, nothing fancy (although I did use the elevator banks that come with the Tomix kit), just a few figures, scrap paper glued to foamcore to simulate  a desk, etc...

With this building, I also used an old technique that modellers have used to simulate window blinds for the first time.  I don't recall the name of this tape (and it was hard to find), but prior to duct tape, this is the sort of thing you would use for packages.  It really does give a good simulation of blinds or drapes (and now I have a huge roll of it for future buildings)!

Sunday, October 25, 2009

Failure! Sometimes I hate DCC! Or... Tomix Track Cleaning Car Conversion Mess!

What a mess. So, I'm on my third Tomix Cleaning Car. I've already burnt out the motor on one so far (DO NOT PUT THESE ON A DCC LAYOUT WITHOUT A DECODER NO MATTER WHAT ANYONE SAYS) and decided I would try to do the DCC conversion on this myself. Its one little car, how hard can it be? Plus, if I screw this one up, I have another one to destroy. This'll be fun.

My approach to DCC conversions is to chicken out as much as possible. Sorry, but those of you looking for expert electronics advice or bundles of encouragement with decoder installs - stop reading. Now.

I like DCC for its operating experience, but hate all the hassle with getting the stupid, expensive clumps of wire and electronics to act like they are supposed to act. All those books about "DCC is simple!" are a bunch of rubbish. Its not even electronics in my mind, more like alchemy. At this point you should realize you should never take my advice on this decoder/install stuff. Seriously. Even if you come back in a year, and I did this crazy cool decoder install that is just amazing and I'm all, like, bragging about it? I'm lying. Don't believe a word. I'm an amateur and following my example will lead to certain failure and a romantic passion for plain old DC control and all that fun you had with the 'direction' switch seeing if you could make your GP9 do a wheelie.

So, now that my utter lack of credentials in this field is firmly established, I will now demonstrate my utter cluelessness with this lame attempt at a decoder install in a stupid cleaning car.

My absolutely shameful and cowardly approach for this decoder install was to take advantage of this circuit board produced by a German company, DigitalZentrale, that uses one of the few (theoretically) simple solutions for decoder installations: the NEM651 plug. In theory, that means most decoder installs should be truly 'plug and play' (in reality, we all know that's not true). Unfortunately, the actual manufacturers who use this standard only really applies to a small set of German manufacturers. So I guess for the rest of the world its "learn how to solder train-boy!".
But I have to hand it to the Germans...the NEM651 is a great idea in a hobby that saw its last creative days when it came up with 3-rail tinplate track. Anyway, I got the circuit board (above), complete with all German instructions (although its possible to get a barely intelligible English translation from Google, but its not that helpful), and started dissembling the track cleaning car.

I did 'cheat' and peak at the garbled translation (I noticed enough "ACHTUNGS!" and "NEINS!" in the German instructions to get the fact that the photos alone may not be conveying some important information).

Taking apart the Tomix cleaner was pretty easy, once you realize that you have to remove the screws from the trucks to remove the cover where the motor is (the instructions showed both sets of trucks being removed, but I don't really see the point of removing the trucks from the side of the car opposite the switch and motor....all there is on that side is just some weights.). In fact, while the photo below shows the correct placement of one Philips head screwdriver to remove said trucks, this is actually a pointless part of the process. But enjoy the photo anyway:
So, with both sets of trucks removed, a firm grip (with -as is usual at this point- more force than you think its wise to apply to these thin plastic shells) and lots of pulling gets the little plastic covers off. You can then have all sorts of fun dumping all the parts out on a table.
So here's a more than useless tip: Once those screws are removed, all the parts really don't just fall out. You'll need to remove that 'fan' thing (round black thing on bottom of car) from the 'pole' ("axle"? "rod"?"stick"? etc...) or whatever that 'pointy' thing is that comes out of the motor at the bottom. I hope you can tell what I am talking about from the above picture, otherwise I just wrote a sentence more confusing than Google's over-rated capability at translating German N scale websites (actually, the Japanese translations are worse, but more entertaining). Anyway, the 'pole thing' on my motor inserts into the hole on the 'fan' thing, and mine was on really tight, and when it finally came off - it flew across the room (of course, I'm not worried if I lose it, cause I have extra parts from the cleaning car that I already fried a motor on! Hah!). So be careful.

Now that all the important pieces are removed and scattered across your desk and you realize you don't really remember how they go back together, its fairly easy to see how this new NEM 651 circuit board will replace the existing circuit board. Did I say I love the NEM 651 format? Yes? Okay, I'll stop repeating myself.

As you can see from the photo below, the new and the old circuit boards. The new board, which has a fancy little NEM 651, 6-pin, Lenz Mini-Gold D ($44.00) decoder inserted into it, sits next to the old one! Right now I'm thinking "Hey! This was easy!"

Yep. Just keep thinking that.
Then came the panic. See, there's this round black thing that goes into the round hole on the original circuit board. At the time, I don't really know what this round plastic thing does and I don't care, all I know is that the 'round black thing' (which also had little metal pieces on it to pick up electrical current! Oh no! Its important! Arg!) WILL NOT FIT IN THE OBLONG HOLE ON THE NEW CIRCUIT BOARD!!! I've been had! Of all the cruddy luck! To get this far, only to find out that I got a circuit board for some other model Tomix cleaning car, this really su.....wait....what's that? The round thing connects to the switch on the top of the Tomix car that turns it on, off, and to CL mode (CL mode, for those of you who don't visit the Japanese train forum and aren't versed in the world of Tomix, is a "Constant Lighting" mode that Tomix came up with so that the lights on Japanese trains always stay on under traditional DC power, or so I think. Its also rumored to be a problem for my Japanese modelling friends in their attempts to convert their Shinkansens and Thomas's to DCC, but that's another story....)?

So I start thinking....if I'm adding a decoder to turn this thing off and on, I probably don't need the "round black thing with the electrical contacts which won't fit in the oblong hole on the new circuit board". So I ignore it and move on. More fun awaits.

Unfortunately, just plugging the decoder into the NEM 651 socket isn't enough, according to the instructions and the design of the cleaning car, you need to bend the pins on the decoder so that they go at a right angle right about where the circuit board ends. With this bend in the decoder, it will neatly rest within a pocket between the weights that surround the motor and the plastic shell (or you could cut a hole in the shell and have it stick out, which will turn out, for me, to have been a better choice). So, bending six tiny little pins shouldn't be all that hard, right?

And its a really good thing I have this handy Google translation tool, because the instructions actually mention "Lenz" in this section (one word I can pick out of the sea of German), so I know I have a Lenz decoder, and I know this is important. So skipping past the original German and going to Google, here's what the translation tells me:
The legs of Lenz decoders can not bend to these break off, they see
bitte davon ab einen solchen Decoder zu verwenden. Please use them from such a decoder.
Whew! Good thing I read that! What was it? Something about 'leg's breaking off' of Lenz decoders? No problem! I get the pliers out and quickly proceed to....break the legs off the decoder! ARGGGGGGGGG! (Do you hear that sound? Have you heard that sound before? Its the sound of a decoder going to decoder heaven).

Plan B

Reminding myself that there's something redeeming about this hobby, that money isn't everything, and that this is still a better way to spend my time than watching TV, I figure out a Plan B. I decide to use one of the Digitrax DZ125 decoders I have hanging around! I am determined to get this job done and start cleaning some track with DCC control! Also, the price is great on these Digitrax decoders too ($20-$25?), so I'm not as worried about....okay, not going there...it will all be fine. Really.

Here's my plan of attack. You only need two wires, I guess. That's what I'm down to. Guessing. Two wires for the motor...that's all you need, how hard can it be? I religiously check the Digitrax instructions to confirm that the Orange and Grey wires are the only two wires I care about.

This is so easy! I should have done this first!

So I strip down the wires, tin them up a bit with my soldering iron (they need to be a little stiff to fit inside the socket) and jam in their respective holes. See photo below.
I think to myself...is there ANY REASON this cannot work? I tell myself "No, there's not! I mean, this is just a DCC decoder installation! Its not rocket science!"......

Moving along....

Put the cleaning car back together. I notice that the new circuit board doesn't sit quite as tightly between the contacts on the motor as the original curcuit board. Also, make sure you put the circuit board in 'shiny side down' (see, that's the kind of decoder installations I can understand! "Shiny side down", or "Plug thing #1 into hole #1"...THAT I can handle! Since when did model railroading become electrical engineering? Some day I should write a post about the electrical diagram I got that was supposed to help me add LED's to a control panel. There were so many weird shapes and squiggly lines...come on, just tell me the "red and black wires" go {And to make even THAT difficult, apparantly, the 'black wires' aren't shown because they are 'common', well PHOOEY! Show 'em anyway! Why are electricians so lazy about this stuff} ! I tell my son that he should go to college and major in electrical engineering if he wants to play with trains like his dad when he gets older). So, the new circuit board is not quite as tight, but it fits, and the whole thing gets reassembled.

With everything back together, I make my way to my old Windows XP PC with JMRI and Sprog II to check out my install and program this bad boy! I also discover that I'm under the illusion that, at least in this hobby, buying more junk will make problems go away. You see, and I've mentioned this before, I wasn't happy with how difficult it was to program decoders with the Trix Mobile Station...the Sprog II looked like a great solution, so i spent more money. In all fairness, its been a lot easier, the problem is you get NEW problems! So its almost like your back at square one!

With everything set to go, I hit the fateful "read decoder" button in the Decoder Pro program and .... I get this:
Error 306 — timeout talking to command station
Fantastic. I end up rebooting, reinstalling, tinkering with COM ports in preferences, updating drivers...you know, all that fun stuff I like to do that got me into this hobby in the first place.

Eventually, after a couple of reboots, I get
Error 308 — No acknowledge from locomotive
That's it. I'm done. Okay, not really. I actually take it apart, check connections, curse the looser circuit board connection, fiddle with stuff, etc... But, like that great Jerry Seinfeld joke " I don't know why I look under the hood of my car when its not working....if there's not a giant switch turned to 'off' under the hood, I'm useless" pretty much sums it up.

So, where am I now? Despair. Disgust. And one fried cleaning car, one broken decoder....and still lot's of dirty track.

Don't worry, the saga will go on. I expect there will be a "Plan C" once I can muster up the courage. I refuse to admit defeat (I'm not that smart). Apologies to all N Scalers, 3-Railers, Germans, Japanese, DCC'ers, Tomix, Digitrax, Trix, JMRI, Sprog, Lenz, electricians and electrical engineers who were offended by this post. I'll do better on my next one. I promise.

Thursday, September 24, 2009

Fleischmann, Tomix, and Kato Roadbed Track


Most of my layout is Kato Unitrack, but through the purchase of various starter sets or unique track capabilities, I've got a little bit of track from Tomix (primarily for their tight radius Tram system), Fleischmann Profitrack (that came with a starter set, but also for some excellent flex track), Minitrix and Atlas.

I thought it might be interesting to provide a few photo comparisons of two of those track systems that have roadbed that are not real well known in the US; Tomix Finetrack and Fleischmann's Profitrack. For reference, I'll also add in a piece of Unitrack (There are two other track systems in N Scale that I am aware of...the new Atlas track system [forgot the name] and the Bachmann EZ Track system)!

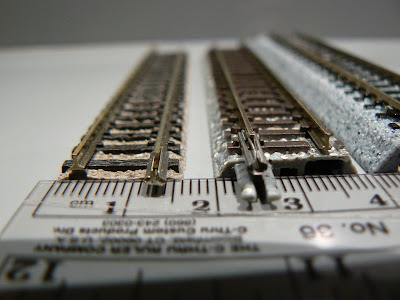
The photo at top shows, from left to right, the Fleischmann Profitrack, the Tomix Fine Track, and the Unitrack. Below is a close up of the Fleischmann and Tomix tracks:

As you can see, the Fleischmann is the narrowest, at just about 16mm, Tomix is a bit wider at 18mm, while the Kato Unitrack appears to be a hefty 25mm in comparison!

While they are all Code 80 - and thank goodness for that! - its fairly obvious that they will need a little effort to get to work together. Tomix, interestingly enough, seems to put its rail joiners on the opposite side of other manufacturers, and with that 'cast in' connector on the Tomix roadbed, some sort of modification (or a Kato Unitrack joiner for this purpose) is necessary.

A final shot below shows a side view....nothing spectacular here, except they all obviously work off different geometries (so you'll have to do some tricks to get them to work together somehow). While I have definite plans to use Finetrack for a tram system in my downtown remodel (103mm radius curves and accessories to make it look like rails in the street...although Kato appears to be right behind them!), Tomix is also coming out with a single track super-elevated curve! That will be cool and will require some big changes to my layout - but super-elevated curves are worth it!

I also have additional plans for the Fleischmann track...given its relative elevation to Unitrack, this would be great track for yards...although the cost of switches with motors in their system is crazy (E.g.: when it makes the Kato #4 switch look like a real value...its too much!).


UPDATE 5 December 2009:

Mel in the comments section is building a layout for his Grandson, and had a question about whether or not an adapter is needed for the Fleischmann track with either Atlas (code 80) or Minitrix track.  Its a good question, and I expect other people will wonder as well!

Here's a couple of photo's of the three types: The first is the Minitrix track connected to the Fleischmann profitrack with just the standard rail joiners from each company:


 While its not perfect, I don't know if any sort of adapter would help.  Below is the Atlas code 80 track and Fleischmann:

The Atlas track as well works nicely with the Fleischmann track.  The Fleischmann track is hair taller, but this can easily be addressed by a very thin shim.   If it were me, I would not worry about an adapter.  I recall reading somewhere that Trix does make an adapter, but I think this was for another track system (Rapido?) that I don't use.

Good luck on your layout project! 

Tuesday, September 22, 2009

Tomytec KFC


Way back in January I posted about my joy in getting a box full of cool little TomyTec buildings (Thanks again Plaza Japan on eBay!). I did mention that my layout is not particularly Japanese themed, so some 'globalization' would be in order. This is just a quick photo of the idea and an okay result of turning one of the buildings into a KFC (which I've personally seen in both China, Japan, and of course Europe...so yeah, 'global' in a weird way! :-)). I've been experimenting with various methods of creating lit or backlit signage for buildings. What you see in this photo is color inkjet printed decal on clear acrylic (sanded for the angle) using Testor's white laserjet decal paper (there are two LED's in the plastic behind it. I've also used other methods, mostly involving color laser printers to avoid that 'splotchy' look the inkjet decals have. More on that in another post....

This building lacks interior detail...which has sort of become an obsession with me. I rationalize the lack as I expect this to be too far from viewer for them to see into the store. Also, the glass doors were a 'quick and dirty' solution. All that you see there is a clear sheet of plastic with the metal wires from clipped LED's glued onto the plastic. That was a spur of the moment solution that turned out okay!

Well, thanks for reading! Hungry for chicken now?

Saturday, September 19, 2009

Buildings and Building The City


Ahhh... Fall! While many of my American readers are thinking "Football!", for me, the cool air and shorter daylight means more time to spend on the layout! My current focus is downtown and the revisions I'm making to the layout driven by a desire for a more interesting, colorful and fun 'downtown'/ urban area on my layout (I spoke about this a bit here).

The image at top shows what sort of 'chaos' the layout is in right now...in fact, all trains have been removed and safely boxed up! What I am doing in the photo above is continuing to work on getting all of the various buildings I have to neatly align to more or less similar sized city 'blocks' (as I talked about here).

Today, I've been using a hot glue gun to attach the buildings together. I wasn't sure how I was going to do this, but hot glue seems to be the answer. The photo below shows the buildings in variuos stages of getting connected to each other. The wood boards are used to prop up the buildings so the wiring for all the lights doesn't get in the way and result in the buildings being unevenly attached.

The below photo is just another close up of the buildings


In addition to putting together the city blocks, I'm also 'modding' out the buildings that haven't seen any attention yet. I recently won a neat lot of older German N scale buildings (Kibri, Vollmer, etc...) and am now updating with new paint, lights, advertising, people, and other details. The below was a fairly simple building, but lights and some minimal detail have made this one of my favorites! :-)


Believe it or not, this building has 12 LED's in it! 4 for the 'backlit' "Super 24" sign, 2 SMD's for signs/advertising, 2 more for the rooftop billboard, 3 for the store interior, and one to backlight the upstairs apartments.


This is another building from my eBay 'score' that will need some work. The 'paper backing' for the upstairs apartment windows works fine, but for the ground floor shop display windows, I'll need to something a bit more interesting. Fortunately I just got a new shipment of LED's and resistors so I can start to add the lighting soon!

Okay, enough blogging...it's a rainy Saturday afternoon, the family is all out doing what they like to do...so I'm back to train room!

Thursday, August 27, 2009

N Scale Cars!

There's nothing more fun than adding the 'icing' to a layout than adding relatively inexpensive additions like...CARS! From the bare bones Model Power blister pack, to the high end LED lit vehicles, there's almost something for everyone! Plus, the real secret to having cars (and accesible roads) on your layout, is that they are great decoys for young children! Instead of being the 'grumpy old man with the train layout' whenever some kid shows up (yours or others), now you have something that is relatively painless to let them touch and push around the layout! Of course, it helps if the wheels move so the precious little child doesn't gouge valleys into your detailed roadwork....

Anyway, I'm going to showcase a few of the N Scale automobiles I have from various manufacturers:

MODEL POWER:

These can be found in the states in nearly any hobby shop. The nice thing is that they are very cheap...there are like 6 or so in the blister pack. Unfortunately, they are pretty cheap, ugly, and totally uninteresting. Relegate these to the back of the layout.

KATO:

Kato sells a box of cars, usually nearby their Unitrack system. Unfortunately, Kato seems to have the N Scale contract for drab, boring, government sedans. The quality is better than Model Power, but the cars are boring. I suppose that's a huge advantage if you don't want to have flashy cars distracting from your trains, right?

WIKING:

Now, finally, with Wiking - a German company I believe - we're getting into some interesting models that you might actually want to look at on your layout. They do a decent VW New Beetle and Porsche Boxster (so the box says) that come together in a package. I guess this is a 'his and hers' type of thing, right? Too bad they chose such poor colors for both models though, as neither of them look as good as they could with a better color choice.

FLEISCHMANN:

Fleischmann, better known for their crappy warranty support (oh yes, they used to make N Scale trains too. See my last post for my little rant on that) also makes a few interesting cars in N Scale. The quality is on the low end, but I like the interesting Citroen car, and the Porsche is cool too. Again, what's with the colors? How depressing. No moving wheels on these.

HERPA:

Herpa, a company which 'owns' a small-scale model airplane market, also makes a few N Scale items. I picked up a package of two Mini Coopers that are really nice looking models! The wheels even move! This is a huge plus in my book. The wheels are not really attached that firmly to the axle, so one of my Mini's is missing its back rear tire. Ah well....should have gone with the extended warranty I guess.

BUSCH:

Better known for their scenery materials, Busch makes a couple of vehicle sets. My favorite is the DHL/FedEx combo. These look good anywhere on the layout...and the wheels move (VRRRRROOOOOOMMMMM!).

Another Busch favorite of mine is their "Polizei" combo. Seriously, who can't pass up a Smart fortwo police car? Talk about striking fear into the hearts of criminals in a high speed pursuit! Of course, as if its not bad enough that the police are using a Smart car, the wheels don't even move!

MINIMETALS:

Mini-Metals does a great job of producing nice quality, metal, N scale models of classic American gas hogs! The metal gives them some nice heft, and the wheels move nicely. Nothing more fun than having the Ford Custom rip through downtown with the Polizei Smart car paddle-shifting its way after them!

TOMYTEC:
Tomytec is by far my hands down favorite 'car manufacturer'. Moving wheels, great looking cars with a lot of detail, good colors, and a HUGE selection of models and types.

I went for the 'big one' and ordered their Tomytec Car Collection Vol 6. Although the box has way more Honda Fits, Demio's, and Vitz's than I'd ever really want, the colors and quality are great additions to the layout.

They also do a great line of trucks, trailers, semi's etc... Tomytec vehicles have become almost a separate little 'hobby' now given how cool these things are. They're not particularly easy to get in traditional hobby shops, but are easy to find a wide variety online.


That's sort of small snapshot of my thoughts on the N Scale vehicles currently sharing the layout with my trains (not to fear, passenger revenues for the railways in Quinntopia will continue to be strong as our urban planners maliciously planned that all of our roads and highways go absolutely nowhere! Ha ha!) back to the trains and layout in my next post.

Friday, July 17, 2009

The Scale Question: 1:150 and 1:160 buildings


Many of my building projects lately have been based on Japanese 1:150 models. I had been noticing these buildings online for quite some time, but the fact that they weren't 1:160 scared me off, until some kind soul on of the N Scale forums told me not to worry too much about it. So I jumped in!

In the spirit of that original, anonymous poster who encouraged me to give the 1:150 buildings a try, I thought I would try and share some 'side by side' comparisons of relatively common buildings found in North America, and put some typical Japanese buildings next to them.

Example 1, below, from left, is the Tomix (actually, Tomytec) Cylindrical Building, and a Kato office building, alongside a (slightly modified) cheap Model Power building. Just by looking at the photo, it does appear that the Kato's doorways are slightly smaller, and the Tomix doorways seem even smaller still. However, comparing the first four stories of the two buildings on the right, it seems like they are pretty close. The Tomix (or Tomytec?) cylindrical building does appear to be slightly smaller than the other two, but how noticeable this would be to a casual observer is hard to know.

Example 2 (again, below), is another comparison between a relatively common N Scale building, the "drive in" (can't recall the official name) compared to the Tomix 7-11 convenience store. Any differences between these two are, for me, very hard to notice, and they look perfectly compatible.

For my 3rd and final example, again, another standard Model Power building compared to a TomyTec 'Town Collection" building. In this case, the doorway on the Tomytec tea is noticeably smaller. For me, this is probably too much, and this building would likely be hidden in a little noticed area of a city (near the back, where the small door way is not noticeable and adds to depth perception?) or it becomes a candidate for some creative kit-bashing.

So what's the final verdict? In most cases, I have found the differences too hard for the casual observer to notice, the exception to this seems to be the Tomytec models (which, for reasons unknown to me, are different than Tomix models) which do appear to be noticeably smaller when placed nearby a standard 1:160 (or even Kato) structures. However, if these sort of details are something you can't live with, I would recommend you avoid the 1:150 structures. If, like me, you find the differences hard to notice if not negligible, then I would suggest you try one like I did and see how you like the results. There's a lot to choose from for under $20 and a whole new world of interesting, MODERN, buildings are yours to be had!

The one thing I find perplexing, and maybe I just have this whole scale thing wrong, but it seems to me that 1:150 should be LARGER than 1:160-not smaller-which is, as shown above, the apparent pattern! Anyone with any ideas on this please leave a comment and fill me and others in!