Showing posts with label structures. Show all posts

Sunday, October 3, 2010

Hack Bridges ("Hack Brücken")

Quick post on some bridge options that are new to me, and may be something interesting to other folks.   A company called Hack Brueken (Brueken - or Brücken - means 'bridges' in German...Thank you Google Translate!) creates pre-assembled metal bridges in an interesting array of styles and lengths (and in multiple scales).  I came across these bridges on eBay and from the description seemed like a something worth checking out for my overpass on the 'red line'.  I have to say, I am very pleased!


Despite being made of metal, they are very lightweight, and definitely feel more solid than any plastic kit you would purchase and assemble (well, maybe not you, but for me..... yeah, some of these plastic kits require far more dexterity and patience and skill with tweezers than I have, but that's another story....).  While very close inspection does not show a lot of detail (e.g. no rivets), I find the general scale of the girders and beams to look a bit more 'realistic' than the usually much thicker 'plastic varieties'.  I think each has its place, and the idea for me is to have a little bit of diversity on the layout for different lines, so it works for me to have both.  Below is the Kato double-track bridge compared to a Hack single track bridge I'm using on my 'expansion':
I like the arched through-truss bridge so much, I ordered a shorter deck-truss bridge as well, although I'm a little undecided about where it will go. 
Full disclosure is that I know very little about bridge types, so if my 'through-truss' and 'deck truss' descriptions are wrong, I got the explanations from ye olde Wikipedia.

So if you're looking for a bridge that is a bit different than the normally available ones, I'd recommend checking out "Hack"...either on eBay or on their website (I shouldn't have to say this, but I have no relationship with this company, just passing on some neat stuff I found).

Tuesday, December 15, 2009

Scratch-building Another Skyscraper

This is my second 'high rise' or 'skyscraper' scratch-building attempt in N Scale. I actually started this one about the same time as the 17-Story "Godzilla Corporation" building, but have not yet gotten around to completing it.

The motivation for this building came from the desire to have a modern-looking skyscraper with the common 'mirrored' glass windows so common on modern buildings.

While I used some similar methods for this building as I did with "Godzilla", the materials are significantly different. First, this building started off as fairly standard clear acrylic sheets (about an 1/8" thick), rather than 1/2" thick 'smoked acrylic' as used on the first building.

The second major difference is that I used window film (typically used to darken car windows) with a 'mirror' appearance to get the affect I was looking for.

Again, I used a straight-edge and an Xacto knife to score the acrylic to simulate window and other surface seams. As opposed to my other building, the scoring on this building is vertical.  I also played around with the idea of using very thin strips of painted styrene for the vertical separations. You can see what this looks like compared to a building face without the strips in the below photo.  I wasn't really that taken with the styrene strips versus just the scoring, so I did not use this approach.
 
To create the impressions of floors in this building, I masked out the actual 'window' areas' and then painted the non-window flooring areas.

My measurements for these areas are:
  • Floor to Ceiling: 18mm or approximately 3/4"
  • Window area: 13mm or approximately 1/2" (which, by fortune, is also the width of the masking tape I used)
  • Floor/non window area: 5mm or about 1/4"
To provide some contrast and hopefully some interest, I seperated the bottom 3 floors from the rest of the structure for the front side (in addition to adding a solid/non-window 'column' to try to add a bit more interest), and started to create a commerical/retail oriented ground floor in addition to an office building entranceway.
I did find a use for the thin strips of styrene on the ground floor, to create the window and door frames for an otherwise plain 'plate glass' street front for the building.

From this point, I started to assemble the four sides, with the large 'vertical column' (which was also 'scored' to have a consistent appearance to the rest of the building design) the progress of which is shown in the photo at right.


Which pretty much leads to the point where I am at right now, which is shown in the photo at the top.  The remaining tasks include some final detailing, particularly on the ground floor, building a roof, adding the lighting and interior details, masking some of the 'windows' on several floors to give off the effect of unoccupied floors, etc... and coming up with a corporate name/logo to emblazon on the top of the building.

I'll post photos of the final product once I've got it completed, but wanted to share this experience as it was a different approach than the first building.

A final comment is that using masking tape to create your window areas actually worked really well.  It is really important to ensure your tape has a good seal as the paint will seep through (and require time consuming clean up!).   I used a good quality grey primer spray paint for thus purpose.  Not the prettiest of colors, but a good neutral color for a building of this era I think.  I expect I will use this spray paint/masking tape technique again in the future for other modern structures, as it doesn't require the tedious task of cutting styrene and is fairly inexpensive.


UPDATE:
Building was finally completed several months later...click here!

Saturday, November 28, 2009

Tomytec and Tomix buildings

Well, after the 19 or so stories of the "Godzilla Corporation's" high-rise office complex, time for a break with some smaller, gap-filling structures.

Way back in February I blogged about how fun the Tomytec building collection ('The Town (Machinami) Collection No.7' to be exact) was. Although the quality isn't great (more on that below), the relative value and diversity of building types is very intriguing for anyone looking for something a little different in their N Scale structures. Plus, they're a lot of fun.

I've done a couple of minor modification to a couple of these, I blogged about the KFC 'conversion' already, and below is a photo of a Chinese restaurant with relatively minor changes.


This was an easy three or four LED modification, with a 'homemade' Peking Garden sign (backlit with LED's) over the front.

You can also make out some of the 'quality' issues with this series in that photo, and its really to be expected.  The walls, floors, etc.... are somewhat warped, and the method that is used to assemble them (which is really just sliding tabs into grooves and held there by friction) tends to result in less than flush corners and joints.  This is not a design problem for Tomytec, as it appears these are aimed for more of a toy-like collector than serious modelers.  In truth, this doesn't bother me much, and there's some things you can do as a modeler to address these issues that are pretty simple.

On the other hand, the amount of screen printing or painting that goes into each one of these models is very much surprising compared to the standard fare seen in most 'serious' kits, and I've yet to actual repaint one of these Tomytec models as their colors and detailing actually work quite well (particularly for 'fill areas' in my city that won't be highly visible).  I should also mention that you get a little packet of 'detail parts' with virtually every building as well, including stairs, signage for the roof, and other various pieces that are made to snap into various holes placed in the roof, floors, walls, etc....

One thing that doesn't look right about the above picture? Well, if its going to be in a 'city', then its not going to sit all alone without some neighbors next to it! And that, my friends, is one way of addressing the 'warped walls'.

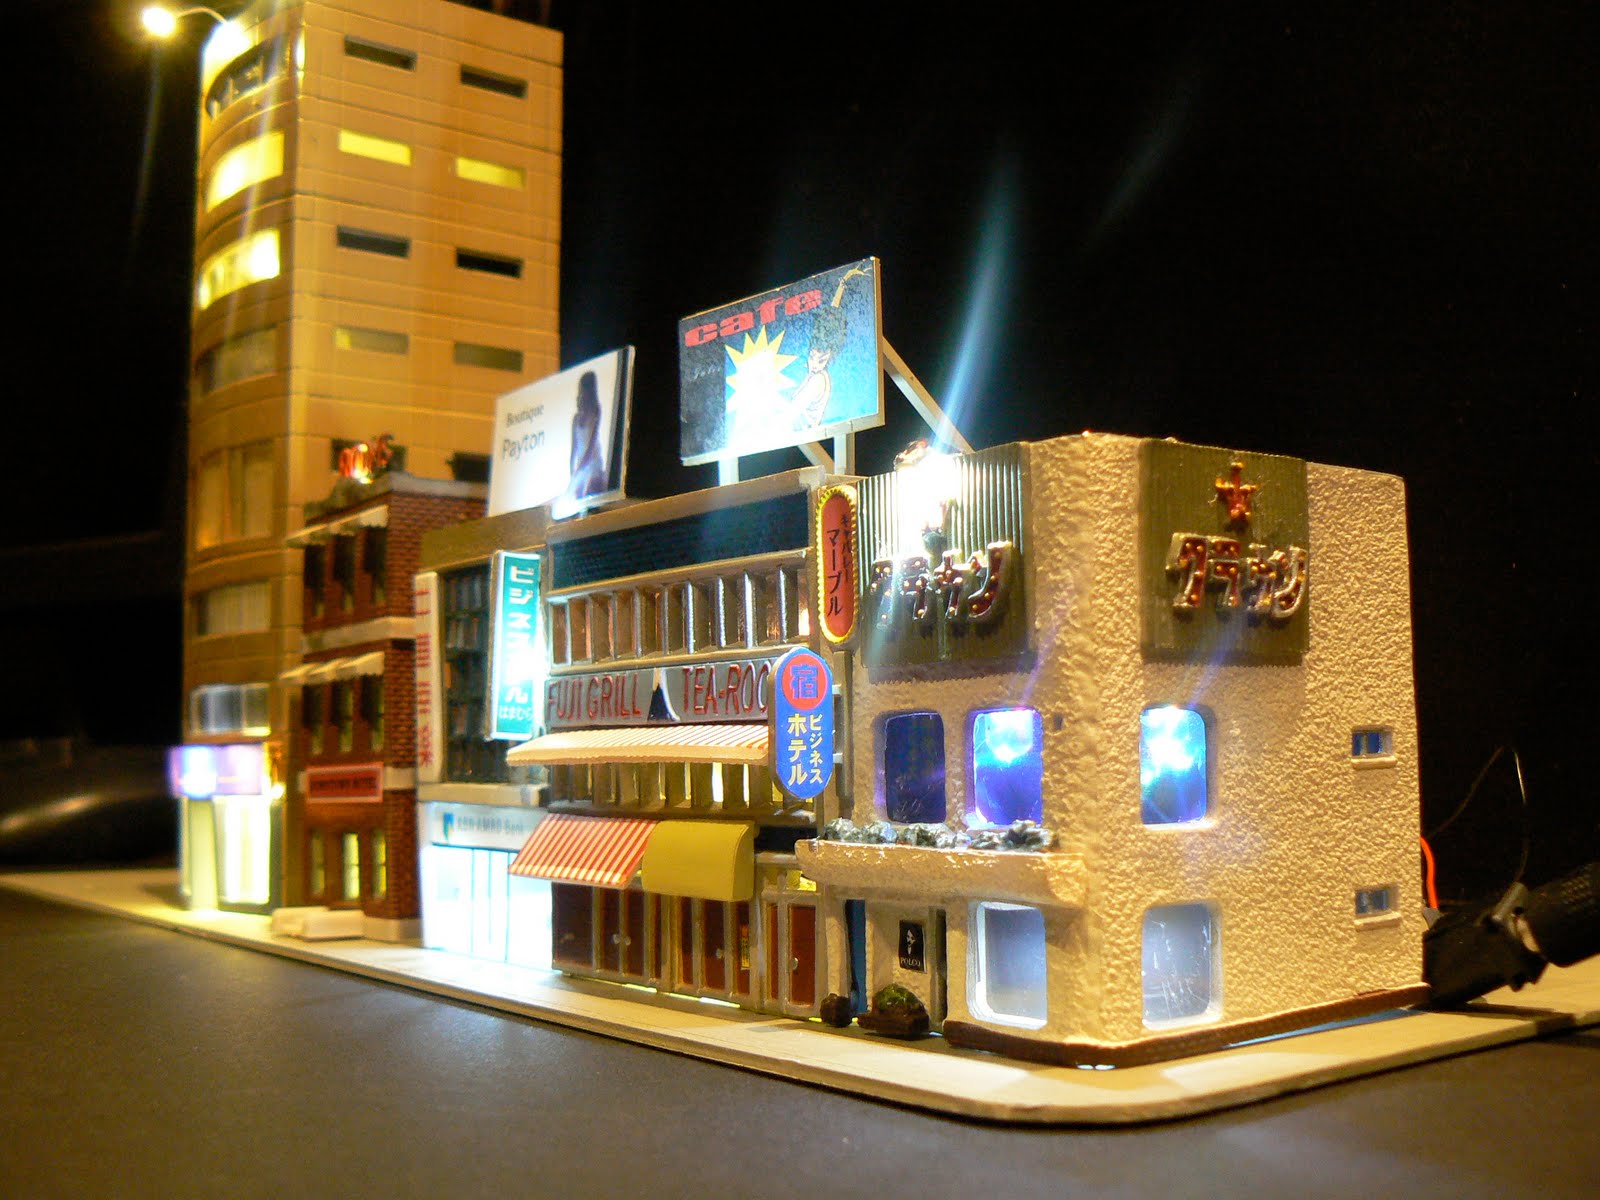
The next project combines three of the TomyTec buildings, removes all the walls (in fact, the center building is actually a corner building that has a triangular footprint) and leaves nothing except the storefronts (only one of which was modified from a very 'traditional' looking Japanese storefront, to a more modern plate glass sort of front).

The following photos show these buildings in the middle of construction prior to the lighting and final 'details':


The building with the clear plastic 'front' is going to end up as a 'bank', the middle building stays untouched (I like the "Fuji Grill" name and graphics too much), while the corner building on the end, with a sort of stucco exterior, gets some crazy color-changing LED's (a nightclub perhaps? not sure what the Japanese characters on it say the building is, but I think a shady little club in the city will work!).


From the 'other side' of the block:

Yes, that brick building on the far left is not part of the Tomytec collection, but I think it looks like it would fit right into this neighborhood.  I think this will make an interesting little area of my city...after the cold, serious 'high rises', this will look like that block not too far off where things are just a little bit edgier!

One other recent project has been the Tomix 4048 'bow front building' conversion to a hotel.  This was relatively easy, but took me forever due to distractions from other projects.  I originally came across this building on Scaper's impressive Flickr site, and knew that I had to have one.  I used two kits, and tried to use the extra ground floor as a 'normal floor' (albeit with high ceilings), to pull this off, I added a strip of styrene in the doorway gap, some clear plastic for the window, and hopefully pull of something that looks like it could be a 4th floor ballroom or something.
I also went a bit overboard and added some interior detail.  I made two 'beds' out of various plastic parts, used scrap paper for wallpaper, and added an  LED for a table lamp (in addition to a third LED that is right above the window shooting down) and of course, a figure doing something.

By the way, its important to get a light source as near to the window as possible (you can see my LED in place below, which did require some milling of the frame above it when I put it together), if you place a light near the 'back' of all your detail, it puts all your detail work in shadow, thus losing a lot of the value of doing this sort of work in the first place.


Here's a shot of the final 'room' with the lady standing there.

Arghh... yes, there's still an unslightly gap there between the building sections (still not done).  And a final shot of the building just prior to its getting its signage (the "Mercuit Hotel"....a name my daughter came up with that means nothing at all!).


The ground floor has some basic 'hotel registration' detail as well, nothing fancy (although I did use the elevator banks that come with the Tomix kit), just a few figures, scrap paper glued to foamcore to simulate  a desk, etc...

With this building, I also used an old technique that modellers have used to simulate window blinds for the first time.  I don't recall the name of this tape (and it was hard to find), but prior to duct tape, this is the sort of thing you would use for packages.  It really does give a good simulation of blinds or drapes (and now I have a huge roll of it for future buildings)!

Sunday, November 15, 2009

Doubling up a Vollmer 7728 Gift Shop


I purchased a Vollmer 7728 N Scale Gift Shop almost a year ago. It sat on the shelf while I tried to figure out what to do with it, until I finally decided to order another one and attempt to make this a much taller building than the original designers intended, similar to what I did with the Greenmax 29 building. This was a very tricky kitbash, as the front of this building has unusual recesses and different windows on virtually each floor.

The first step, whenever I put together a new building, is get a paper towel and some water and clean off the sprues. I then remove the parts from the sprues and paint them (given how light the parts are, I usually place them on some masking tape so they don't go blowing off onto the ground or worse!). If I plan to light the building interior, I also put a coat of paint on the inside walls to ensure that no light can pass through the plastic walls.

My final plan was to combine the top two floors of each model together, as these floors are all 'recessed'. That will make the bottom four floors flush with the building front. I ended up having to use some styrene strips to make the entire front look seamless.


This is another 'fashion' store (I'm getting my daughter to help me come up with store ideas, and she thought my city needed more fashion stores!) but rather than use mannequins (e.g. N scale figures) in the shop windows as I've done with other stores, I just used images that look like those you'd see in a fashion store window. I sort of expect that this building won't be as visible as others, so I didn't go overboard with a lot of detail like I tend to do with others!

Again, lot's of LED's went into this building, and there is even one floor where the apartment dwellers can be seen inside (although the photo here is pretty crappy...can't get the camera to focus on the interior!). For most floors, I used the 'window coverings' that Vollmer includes...these do a nice job of simulating drapers and ensure that there's a bit of variety on every floor like you'd expect from a 'real' apartment building.

On the back side, there are large windows that I diffused with some laquer spray and overlaid with some clear orange acetate. I don't even know if this side will be visible but...well, at least its done.

All in all, this will be a bright - and colorful!- building on the layout! I still haven't decided what the roof sign will be yet (the sign up there now in the photo is a placeholder) but that can be worked out with other details later!

Wednesday, October 21, 2009

Creating a skyscraper from scratch (Part 2)

In my last post, I talked about getting the basic materials to create my "Godzilla Corporation" global headquarters skyscraper. In this post, I'm going to add the sidewalls, work on the back wall, create floors and do something to decorate the interior....

The Sidewalls:

The photo at right shows the 15.5 inch long strip of "sintra" material that I will use for the side walls. This skyscraper will only have windows in the front and back, so 'blank' concrete walls work just fine for the sides. Sintra is a material I have used a lot of in my layout, and its a good material for buildings as well, although its too thick to work for walls on smaller buildings, as part of a large skyscraper structure (representing thick reinforced concrete walls), it works fine.

I made the sintra side walls about 1.5 in longer than the smoked acrylic to allow for the ground floor entrance, shops etc... I will use some traditional 'clear' acrylic for the ground floor, which I will cover in a later post.
After attaching the two sides, I then started work on the back of the skyscraper. Since this building will sit in a block with other, shorter, buildings, I painted the first 8 inches or so and left the top half clear. I then applied the 'scoring' to the exterior with the same measurements used for the front (16mm between 4mm floors).As you can see from the above photo...the building can stand (I'm like a proud father all over again! Let's just hope this 'baby' doesn't learn how to walk! Arg....bad joke. Sorry!)! However, one thing you'll notice is that its easy to see right through the smoked acrylic 'windows' through to the wood of the plywood behind it. Even with the 'back' wall attached, the building will look more like a semi-transparent block than a skyscraper if I don't do something to change this.

The Office Floors:


The solution to ensure it doesn't end up looking like a big chunk of empty plastic was to use traditional foam core. I cut 18 pieces of foam core to fit inside the skyscraper (also cutting out a rectangular area on the backside which will be an access area for where my wiring for the interior lighting will run).I then spray painted just the tops of the foam core with an appropriately neutral looking color, and added in scraps of foam core, office furniture, and other little details to give some dimension to the floors. I only added real detail to about 3 floors, as I expect that these 3 floors will be well-lit with LED's with the others being relatively 'dark'.
Its important that only the top of the foam core recieves the spray painting, as the black edges will go against the inside walls opposite of where the 4mm scoring is on the outside, and since the sides of the floor foam core pieces will show through, its important that they not attract attention. Hopefully, this way, it looks like there's a real floor there (the thickness of this acrylic, which you can see in an above photo quite clearly, does concern me a bit. It'll be interesting to see what the final product turns out to look like!)!

Interior Walls:

The other detail to address is the interior sides of the building. Having 'black' for interior walls (the unpainted color of the sintra I used) just wouldn't look right (unless this was an office building for vampires, but...no, no, let's not go there...). So I decided to create some 'fake' details on my computer. I used a basic drawing program to create 16mmx 32mm rectangles and filled them in with muted office colors, small images of office-like posters, and other stuff. I then separated this rectangle with another 4mm black rectangle (this is where the foam core will cover it up). After doing a lot of copy and paste to reproduce 19 floors of office walls on both sides of the building, I printed out on my color inkjet, cut to the right shape, sprayed the backs with adhesive spray, and applied to the inside walls! Viola! Instant detail!
That's it for this update! If you have a questions or comments (thanks Don!) please leave a comment! Next time...its lighting and ground floor detail! Whoohoo!

CLICK HERE for Part 3!
CLICK HERE for Part 1!

Sunday, October 18, 2009

Creating a skyscraper from scratch (Part 1)


Or....How the "Godzilla Corporation" built their major downtown office complex!

I've been thinking a lot lately about attempting to build my own skyscraper. Given the relatively sparse offerings (although, not as bad as one would think) for modern N scale skyscrapers, I wondered if it was possible to build my own. I spent a lot of time researching and thinking about various materials, and I think I've found a relatively simple method to create a very cost effective, and hopefully very cool looking, modern skyscraper.

Actually, I have two different skyscraper scratch-building projects going on right now, but I am just talking now about the building that (I think) will become the "Godzilla Corporation" worldwide headquarters.

Materials - Use what you find:

Windows are the hard part. Obviously, I don't have the ability to cast scale window frames, etc... so the key is how to most effectively simulate it? As I started studying 'real' modern skyscrapers, what I notice is that the lack of detail - really just lines where the exterior glass plates come together - should make this kind of project much simpler. Additionally , most modern buildings seem to always use some sort of tinted glass. This can be achieved with automotive tinting film, or (and what I will use in this project) 'smoked' plastic/acrylic sheets.

In fact, I got lucky (which is one nice thing about not having too much of a pre-determined plan!). On a recent visit to the TAP Plastics shop near me (which is a shop which specializes in plastics, typically for signs and so forth) I was looking through their scrap bin and came across 2 pieces of 14 x 3.5 inch 'smoked' acrylic.

I also picked up some of their other 'scraps' which will be good material for testing and for the other skyscraper project I mentioned earlier. The best part? Cheap! $2.50 a pound was the rate, and I think I had a pound of scrap total!

Making Windows Out of Nothing at all:

There were 3 methods I was considering for transforming this boring plastic/acrylic material into something that looked like a skyscraper: Using strips of styrene (or plastic) glued on; Masking and painting, and finally, 'scoring' the plastic with a knife. I did some early tests with scoring and liked what I found! I scored lines across the surface at 16mm intervals, then added another score 4mm after that, and so on.What's cool is that just one score with the xacto knife was all it took to give a pretty good representation of the seams of a modern skyscraper. I fiddled around with rubbing some silver and white paint into the score marks, but found it was unnecessary (at least on this dark, 'smoked' acrylic).

Of course windows, even on modern skyscrapers, are not made of a single plane for each floor, so I needed something to run vertically. I could have added more scoring, but I wanted to try something different. I tested the look of adding some vertical 3mm styrene strips and I was very happy with the look!
Clearly, its a very '1970's' looking skyscraper, but I'll take it! I used some styrene 90 degree corners for the edges which fortunately look good with the vertical strips. I glued the corner styrene pieces (using a hot glue gun) with enough of a gap to fit my side sections (the flat piece to the right in the above photo) but that is for my next post!
On my next post, I'll talk about adding the side walls, ground floor details, office floors and other stuff! Please leave a comment if you find this interesting! Thanks for reading!

CLICK HERE for Part 2!

CLICK HERE for Part 3!

Monday, October 12, 2009

Plastic Surgery on a German Toy Store! ("Spielwaren")

A couple of posts back I mentioned the 'remodel' I was going to attempt on another of the old, built kits I had recently picked up. This building, with the prominent "Spielwaren" raised letter sign ("toys" in German I believe) has since 'gone under the knife' to come out as a slightly different type of toy store!

So here's the original building "before":
And here's the 'modified' version "after":
The difference? Repainted, added LED's, new (flat) roof, and laser-printed color decals.
Yes, eventually I will talk about trains again, instead of just buildings! :-) But as I am doing some additions and changes to the layout (all of which involve adding a new yard and expanding the downtown area) all of the trains are boxed up safely out of harm's way!

Wednesday, September 30, 2009

Atlas Skyscraper Complete (& modified)


Atlas produced a line of skyscraper kits well over a decade ago (as near as I can tell). Although they can still be found on eBay, they tend to be fairly pricey. The kits were produced in 3 versions; a square, rectangle, and a hexagon version (the later was a sort of gold/copper color vs the dark grey/black of the 2 former models).

I was fortunate to get the square one at a hobby shop for something close to its original retail price, which was a great find! However, I soon realized this thing is huge! Not just in height (which is what I wanted/expected!), but in footprint...the total base of the square skyscraper is about 9 inches!

Well, I had to make a choice...use the skyscraper as is, and take up a lot of urban real estate with one structure, give up and put it up on eBay for someone else to use, or cut it down and modify it to make it fit with my layout.
I chose the later, although with some trepidation. The materials used by Atlas in this kit are a fairly thick sheet of 'brittle' plastic...not the relatively 'soft' plastic most kits are made of. So cutting it was going to be very interesting (This plastic also has a slight amount of transparency, which could be good or bad depending on how you look at it - uh...no pun intended).

So, what did I do:

1. Cutting. I took about 1/3 of the front and back off the kit. Making the front of the building around 6 inches. I cut the sides by about half, slightly less than 4 inches deep. The dimensions were made to fit into the 'city block' that I had in mind for this building. I cut it the old-fashioned way: scoring with a knife. This was a long, tedious process to do with 8 different sections, and there are some areas where the plastic was just not willing to score nicely and 'cracked' a bit. Yikes...."try not to think what you COULD be getting for this on eBay right now" went through my mind a couple of times. Ultimately, I got it done!

2. General Lighting. Again, added a bazillion LED's. A flashing LED for the antenna on the roof. A total of seven LED's for the backlit "HSBC" signs (which is "Hong Kong Shanghai Banking Company" a great global 'brand' to go with my 'globalization' theme), an SMD over the office door, and about 5 LED's to light the HMV store also on the ground floor.

3. Office lighting. Before assembly, I taped the pieces together adjacent to the piece it would later be glued to. On the inside surface, I then used 1/2 in masking tape to 'block' random windows, spray painted the inside surface to create an 'opaque' area, then removed the masking tape. I later used some 'under counter' LED strips (from the local hardware store) glued to a central column inside the hollow building to give the transparent window areas some light. I may have to add more to get more light, but it works for now.

4. Assembly. Assembly on this bad boy required the big guns....so I 'borrowed' my wife's low-temp hot glue gun. Love that thing. The big challenge was getting a nice fit (I won't say seamless...that's hard enough with the factory finish!) between the connecting sections that I had cut and scored. I sanded down the edge so that my scored sides would have a 45 degree bevel, well, I tried the best I could. I give myself a "C" on that one. Something to come back to and work on later.

5. Other stuff. I had to create my own roof. The roof system on the original model was just inadequate to use for this sort of modification. Same with the first floor (with the exception of the 'entrance doors').

And that's it! Easy huh? Actually...about two weekends of work! What do you think?

Tuesday, September 22, 2009

Tomytec KFC


Way back in January I posted about my joy in getting a box full of cool little TomyTec buildings (Thanks again Plaza Japan on eBay!). I did mention that my layout is not particularly Japanese themed, so some 'globalization' would be in order. This is just a quick photo of the idea and an okay result of turning one of the buildings into a KFC (which I've personally seen in both China, Japan, and of course Europe...so yeah, 'global' in a weird way! :-)). I've been experimenting with various methods of creating lit or backlit signage for buildings. What you see in this photo is color inkjet printed decal on clear acrylic (sanded for the angle) using Testor's white laserjet decal paper (there are two LED's in the plastic behind it. I've also used other methods, mostly involving color laser printers to avoid that 'splotchy' look the inkjet decals have. More on that in another post....

This building lacks interior detail...which has sort of become an obsession with me. I rationalize the lack as I expect this to be too far from viewer for them to see into the store. Also, the glass doors were a 'quick and dirty' solution. All that you see there is a clear sheet of plastic with the metal wires from clipped LED's glued onto the plastic. That was a spur of the moment solution that turned out okay!

Well, thanks for reading! Hungry for chicken now?

Saturday, September 12, 2009

N Scale Office Furniture

Do you know what you can't buy in N Scale?

Office furniture.

Park benches? Yes!
Japanese food stands? Yes!
Oktoberfest details? Yes?
Office furniture? No.

Its as if the N Scale world excludes any 'white color' occupations! Which is a shame really, because Kato, Tomix, and Greenmax have really done some great N Scale buildings (1/150 scale at least) with big wide, modern looking windows which - to my eye - look somewhat naked with nothing going on 'inside'! One creative solution is to add various window treatments (I think there are some commercially available products out there that allow you to fill windows with illustrations, etc..), or to 'blur' them with some spray paint technique (dullcoat or specific products for this from hardware stores).

These approaches work okay for some buildings....the Vollmer and Kibri kits come with a pre-printed color sheet of paper that you insert into the building behind the windows which actually looks convincingly like drapes and window coverings when backlit with lighting. And for larger buildings, I've gone with a more 'suggestive' approach of blacking out some windows, and 'fogging' the rest with some 'glass fogging' spray paint from the hardware store. But these approaches don't work great for all of the buildings, so its time to get creative.

I decided I would create my own N scale office cubicles to fill some of the floors of my modern office structures (which, of course, are brightly lit). This was actually a pretty simple and easy exercise.

The simplest method I came up with requires two basic materials: A 1/2" or 12mm wide strip of styrene, and a 90 degree corner piece of styrene.

The flat styrene is cut to make squares or rectangles of slightly less than 1/2" or 9mm, and then cut a piece of the 90 degree styrene corner piece to 10-12mm (again, about a half inch or less). Then glue the corner piece end to the face of the flat styrene 'square' piece so that it is flush on the edge. The picture shows this better than I can explain it!

Once you've assembled a decent batch of these things (after all, a sole 'cubicle' is kind of a contradiction), I set them on a strip of masking tape and gave them a nice coat of a nuetral, boring color appropriate for the modern office environment.

Given all the excess stickers I find with the above mentioned Kato, Tomix, Greenmax kits, I use these stickers to add some color to the cube walls.

Wallah! Now that you have your cube, get to work! :-)

Okay wait, something's missing! Where do our little N Scale yuppies sit! This was a harder one for me to figure out, and I don't think the end result is as convincing as I wanted. Nevertheless, I used some Styrene I-beams, and cut them into about 1/8 inch pieces (or 4mm). I then used my trusty Xacto knife to carve the top portion into a U shape (which will be the 'seat') and gave a little trim to the center of the I-beam to hide the I-beam look. Is it a chair? Well, they lack backs and arms, but if a figure is glued to it, its unlikely that will be significant except to the most discerning eye. But did I succeed? I don't know. I think I've created the first scale model of toilets more than anything!

The proof is in the pudding (whatever that means), and when its all put together, I think it turned out okay.

Thursday, September 3, 2009

Creating Sidewalks


Having (finally) come to a point where I think have 'enough' (is there really ever enough? :-) ) buildings to start putting my city together, the question of how to tie together various buildings- from different manufacturers- needs to finally be answered. Specifically, how to create a city scene with consistent looking sidewalks especially since most manufacturers have various ways of adding (or not) this feature to the structure.

Its very apparent that just using the 'default' sidewalks from various structures, and patching the gaps for those buildings without sidewalks, just won't look right. You also may, as I do, want to add street lights and other features. Additionally, given that every building in my city now has electricity (this is a modern city after all!) that means a LOT of wires need to be managed.

My solution is to create 'city blocks' that will have all the various buildings attached to the 'block' and allow for me to create a consistent sidewalk look. In addition, by unifying multiple buildings on one piece of 'city block', I can more easily manage the various electrical wires and connections.

In order to have 'sidewalks' that sit flat, are sturdy enough to hold multiple buildings, and stand up to the drilling etc... (to allow for the holes for the electrical wires) it has to be thin and rigid. The best choice I found is 1.5mm styrene sheets. According to some online scale calculators I used, where 1.9mm = 1 foot, then my sidewalk height is around 7 inches, which seems to be about right (and visually it looks good, see photo next to car).

As for how to set up my city block, I tried different combinations of buildings; looking for the best combination of height, width, and length, to give the appropriate affect. The photo shows a mock up of what I think will be 'city block #1'. The overall dimensions of this block are 8" x 16", a second block (not shown) is a bit wider at 9" x 16".

After determining the dimensions for my city blocks, I carefully cut the corners using a coin as a guide. I then made very light 'grooves' in the styrene for the sidewalk markings. I made a very small 'outline' for the curb around the entire outside edge, and then added in a grid of small, light grooves with the hobby knife for the main sidewalk part itself.

I used a 'concrete' colored spray paint from the local hobby shop. After that dried, I used some diluted Citadel black and brown ink (the Games Workshop brand, but I think any dilated paint would work just as well) to darken the grooves I made with the knife earlier.

I'll post some photos of the sidewalks and 'city blocks' once I've attached the buildings (the plan is to use hot glue to attach them, but not sure how well that will work) lights, and everything is all wired up!