Thursday, October 7, 2010

Locomotive Roster: BLS Class 420; Minitrix 12781


Its been a while since I've talked about any of my locomotives so - while the layout is still a mess - I thought I would try and catch up.   This Minitrix BLS Class 420 is my second BLS locomotive, but like my first one, I love the color scheme and the lines of both of these a lot.  The color scheme is striking to me...the use of that funky neon green against the silver/metal body, with the bold, dark blue stripe has such an awesome modern look to it.

Additionally, the BLS is a Swiss railway I've only barely begun to understand, but it has a really fascinating history and one that seems to me to be quite unique (its history sounds very...American, if you will, compared to most of the railway histories in Europe - reminds me a lot of the competiton between the Great Northern and the Northern Pacific here on the Pacific Coast of the US).  The brief history on Wikipedia of this unique line is pretty fascinating reading.
This locomotive from Minitrix is also quite fascinating!  The detail work and crispness of the painting is up to the typically high standards that I've come to expect from Minitrix.  The 'silver paint' has a very convincing look for the 'steel' of the locomotive body...something that is often quite difficult to replicate on these plastic shells!

Although I have not had much time to run it given the ongoing layout renovations in the past year, the motor is whisper quiet with smooth acceleration and deceleration. 

While it is quite easy to bemoan the high cost of Minitrix compared to say, Kato, there are differences which should be pointed out in all fairness.  First, as I mentioned above, the low noise factor indicates some level of modern engineering expertise that I don't expect can come cheaply to any firm.  Second, a look at the underside of this locomotive reveals the metal gears and other metal parts, which represent a level of quality (one assumes) that is much more expensive to produce than with plastic gearing and parts.  Does this mean this locomotive will have a longer life expectancy?  Let's hope so given that the costs of these are so high compared to a similar Japanese locomotive!  And as is typical with European N scale locomotives, you have the option of using overheard catenary to pick up electricity, which is also a feature which adds to the cost (note the red switch in the below photo).
Like most modern production from European manufacturers, the smart NEM 651 socket feature is provided and is easily accessible with the removal of the shell.   I've said this before, but this is hands down the best system for adding DCC out there, and it would be great for all modelers if other firms adopted this method (Atlas? Kato?).  A nice overview of the simple process of converting one of these locomotives to DCC can found at N-Gauge Blog.  The decoder installed in this locomotive is the Trix 66838.  This is not my first choice as they tend to be more expensive than Lenz or ESU decoders, but this was all that was available at the time of purchase!

So...here's the bad news.  Despite the ease of adding a decoder I ran into some issues when I first attempted to read the decoder,; that is....an error.   Even attempting to communicate to the decoder using the default address of "3" resulted in no response from the locomotive.  I took it back to Walter at Euro Rail Hobbies and he couldn't get it to work at his shop either.  Leaving it in his reliable hands for several weeks, he later returned it to me in good working order, but had to make some soldering repairs to the circuit board where (apparently if I recall correctly) it was not properly soldered.

Unfortunately, this issue with Minitrix circuit boards, specifically regarding the contacts of their NEM 651 sockets is not an isolated case, as I've read of several other owners having similar quality issues on some of the European Railway message boards.  Let's hope Minitrix gets this quality issue sorted out quickly (if they haven't already) - its really not at all acceptable given the prices they charge not too mention the damage this does to the brand's reputation.  

The good news is that I got this locomotive through a dealer who can also service these locomotives and the fact that Minitrix does have a 2 year warranty on its products.

It works fine now and I'm looking forward to seeing it stretch its wheels out on my new viaduct in the near future as the messy parts of my layout expansion get completed!

Sunday, October 3, 2010

Hack Bridges ("Hack Brücken")

Quick post on some bridge options that are new to me, and may be something interesting to other folks.   A company called Hack Brueken (Brueken - or Brücken - means 'bridges' in German...Thank you Google Translate!) creates pre-assembled metal bridges in an interesting array of styles and lengths (and in multiple scales).  I came across these bridges on eBay and from the description seemed like a something worth checking out for my overpass on the 'red line'.  I have to say, I am very pleased!


Despite being made of metal, they are very lightweight, and definitely feel more solid than any plastic kit you would purchase and assemble (well, maybe not you, but for me..... yeah, some of these plastic kits require far more dexterity and patience and skill with tweezers than I have, but that's another story....).  While very close inspection does not show a lot of detail (e.g. no rivets), I find the general scale of the girders and beams to look a bit more 'realistic' than the usually much thicker 'plastic varieties'.  I think each has its place, and the idea for me is to have a little bit of diversity on the layout for different lines, so it works for me to have both.  Below is the Kato double-track bridge compared to a Hack single track bridge I'm using on my 'expansion':
I like the arched through-truss bridge so much, I ordered a shorter deck-truss bridge as well, although I'm a little undecided about where it will go. 
Full disclosure is that I know very little about bridge types, so if my 'through-truss' and 'deck truss' descriptions are wrong, I got the explanations from ye olde Wikipedia.

So if you're looking for a bridge that is a bit different than the normally available ones, I'd recommend checking out "Hack"...either on eBay or on their website (I shouldn't have to say this, but I have no relationship with this company, just passing on some neat stuff I found).

Saturday, April 3, 2010

When Trains are Cool (Great Video)


Electrique feat. Solex - Train Grande Vitesse
Uploaded by NextBuzz. - Music videos, artist interviews, concerts and more.

Not sure how I came across this little video, but-despite the low quality-its a great little video of the French TGV accompanied by a cool little electronic ditty by a band named Electrique (whom I believe are defunct) name... "Train Grande Vitesse".  The song, by the way, explicitly features the distinctive audio notes played in SNCF stations for TGV announcements.  That's pretty cool.

Terrific editing on this video, and great staging for a model train layout on video.  Very inspirational!

Its stuff like this that makes trains cool and fun.  Not sure who was behind this, certainly a huge difference from the 'banjo-backed' music you find accompanying most train videos!

Tuesday, December 15, 2009

Scratch-building Another Skyscraper

This is my second 'high rise' or 'skyscraper' scratch-building attempt in N Scale. I actually started this one about the same time as the 17-Story "Godzilla Corporation" building, but have not yet gotten around to completing it.

The motivation for this building came from the desire to have a modern-looking skyscraper with the common 'mirrored' glass windows so common on modern buildings.

While I used some similar methods for this building as I did with "Godzilla", the materials are significantly different. First, this building started off as fairly standard clear acrylic sheets (about an 1/8" thick), rather than 1/2" thick 'smoked acrylic' as used on the first building.

The second major difference is that I used window film (typically used to darken car windows) with a 'mirror' appearance to get the affect I was looking for.

Again, I used a straight-edge and an Xacto knife to score the acrylic to simulate window and other surface seams. As opposed to my other building, the scoring on this building is vertical.  I also played around with the idea of using very thin strips of painted styrene for the vertical separations. You can see what this looks like compared to a building face without the strips in the below photo.  I wasn't really that taken with the styrene strips versus just the scoring, so I did not use this approach.
 
To create the impressions of floors in this building, I masked out the actual 'window' areas' and then painted the non-window flooring areas.

My measurements for these areas are:
  • Floor to Ceiling: 18mm or approximately 3/4"
  • Window area: 13mm or approximately 1/2" (which, by fortune, is also the width of the masking tape I used)
  • Floor/non window area: 5mm or about 1/4"
To provide some contrast and hopefully some interest, I seperated the bottom 3 floors from the rest of the structure for the front side (in addition to adding a solid/non-window 'column' to try to add a bit more interest), and started to create a commerical/retail oriented ground floor in addition to an office building entranceway.
I did find a use for the thin strips of styrene on the ground floor, to create the window and door frames for an otherwise plain 'plate glass' street front for the building.

From this point, I started to assemble the four sides, with the large 'vertical column' (which was also 'scored' to have a consistent appearance to the rest of the building design) the progress of which is shown in the photo at right.


Which pretty much leads to the point where I am at right now, which is shown in the photo at the top.  The remaining tasks include some final detailing, particularly on the ground floor, building a roof, adding the lighting and interior details, masking some of the 'windows' on several floors to give off the effect of unoccupied floors, etc... and coming up with a corporate name/logo to emblazon on the top of the building.

I'll post photos of the final product once I've got it completed, but wanted to share this experience as it was a different approach than the first building.

A final comment is that using masking tape to create your window areas actually worked really well.  It is really important to ensure your tape has a good seal as the paint will seep through (and require time consuming clean up!).   I used a good quality grey primer spray paint for thus purpose.  Not the prettiest of colors, but a good neutral color for a building of this era I think.  I expect I will use this spray paint/masking tape technique again in the future for other modern structures, as it doesn't require the tedious task of cutting styrene and is fairly inexpensive.


UPDATE:
Building was finally completed several months later...click here!

Thursday, December 10, 2009

Super-elevated curves and cant track from Kato and Tomix!


If there ever was a brilliant idea that- once you see it -you think "why didn't they think of this a long time ago?"  Well for me its got to be the new super-elevated curves (or 'cant' track as Tomix calls it) being put out now by both Kato (for Unitrack) and Tomix (for Finetrack).

Having once attempted to create this effect with traditional snap track (and quickly giving up in failure), I am so excited to see a good, easy to add system being produced!

So how do they look?  First, some comparisons:  From left to right below is the Kato 414/381 radius double-track, super-elevated curve (item 20-181); to the right of that (the second Thalys) is a traditional Kato 381 radius, to the right of that is the Tomix 391 radius, 'canted' (i.e. 'super-elevated), 'wide rail', single-track section of Finetrack (item # 1744); and just to the right of that (out of the picture) is another Relay Tsubame on another plain jane 381 radius):

I am super excited about how great they look!  Not sure how well it comes across in the photo, but even standing still it appears like the locomotives on the super-elevated track are actually moving compared to the traditional curves!

Here's another photo with a close up comparison of two Relay Tsubame's on curved track.  As above, the track on the left is the Tomix 'super-elevated' with a radius of 391, next to it is traditional Kato 381 radius:

Nothing I can say can do a better job than that photo!  So how does each system compare?

Here's a close up profile of the Unitrack Super-elevated curve:

As you can see, pretty apparent super-elevation!  As of this writing, Kato only produces a super-elevated curve in a double track version, which is a kind of bummer.  There is some news that they do plan on producing a single track version in the near future (no doubt prompted to do so by arch-rival Tomix!).

Below is a profile shot of the Tomix 'cant' track (or 'wide rail' or whatever....). 

Again, pretty cool super-elevation on this!  Of course, if you're not using Tomix Finetrack, you'll notice that they have this unusual and proprietary 'connector' thing on one rail.  The Kato Unitrack adapters sections are actually made just for these Tomix track sections (Side note: a lot of folks, myself included, were under the impression that the Kato Unitrack 'adapter section' was for all non-Unitrack connections, but that's not true.  Kato Unitrack is pretty straight forward code 80 and you can easily connect Atlas code 80, Minitrix, and Fleischmann and probably others that I don't have).

Some observations on these curved tracks:
  • YOU WILL NEED THE EASEMENT SECTIONS for both the Unitrack and Finetrack super-elevated curves. The 'easement' sections are just what they sound like....traditional 'flat' on one end of the curve, which then 'eases' into the 'super-elevated'elevation on the other end.  Obviously, you connect your straight, non-super-elevated track to one end, and the super-elevated section to the other.  
  • "Short" easements and "long" super-elevated curves.  In other words, the 'easement' sections for both lines are 22.5 degrees, whereas the super-elevated curves are 45 degrees.  This limits some of the flexibility you might otherwise want if your actual radius is greater than the 381/391 or 414 that are offered. More on this below.
  • For whatever reason, both the Kato and Tomix versions are molded and painted to resemble concrete ties.  This is disappointing as it will 'stick out' when connected to traditional 'wood tie' track.  I have it in my mind to try and paint the ties, but that's something down the road when I've run out of interesting things to do.
  • And yes, the Tomix Finetrack curve is unusually wide.  Not really sure what they're planning...perhaps it has something to do with increasing stability, or maybe its just an asthetic requirement to be consistent with other pieces they are producing. The Kato double track version is consistent with their other double track pieces.
Below is a photo showing pieces from both systems which will better illustrate why your radius options are a little challenged with both company's products.  The track on the top is the Kato double track, and the track below that is the Tomix single track version:

The smaller sections on the bottom right of both company's super-elevated curve systems is the 'easement' track (or what Tomix calls the 'approach track') and is 22.5 degrees. The longer pieces are the fully super-elevated curves, which are 45 degrees- and do not get any smaller unless you take a hacksaw to them!  Obviously, if you JUST want a 90 degree radius curve, you'll have to make a compromise and use two easements on each side one 45 degree curve section.  This will reduce the impact of large sweeping (and super-elevated!) curves unfortunately.

You could do what I tried, which is to put two easements on the leading edge of the curves, add in the super-elevated pieces, and then plug some traditional straight pieces between the two super-elevated curves.  Not sure if I'll stick with this arrangement, but it is possible and I haven't had any problems, but I also don't think I'm gaining anything over what I proposed in the above paragraph.

As you can tell from the above photo, I have the Unitrack super-elevated curves/easements on my layout.  I haven't had a lot of running time the past several months, but when I have run trains across these curves, I have not noticed any problems at all.  So far, so good!   I have yet to install or run trains on the Tomix curves.  These will be used to replace some standard Kato viaduct pieces (single track) to create a much more interesting, sweeping, SUPER-ELEVATED bridge that will replace the somewhat boring set-up I have now (check back on this blog in several months and hopefully I'll have an update on that).

Yes, I'm 'sold' on super-elevated curves!  I'm hoping that these products are successful and we can begin to see more variations in the sizes that are offered in the future so I can 'upgrade' all those traditional curves!

Here's the breakdown on the part numbers from each company:

Tomix "Wide Rail" 'canted' Finetrack:

Easements: Tomix Item 1754 "Wide PC Approach Track"  CR(L)C391-22.5-WP(F)  - This package includes two 22.5 degree easement curves. 
Super-Elevated Curves:  Tomix Item 1744 "Wide PC Curved Track C391-45-WP(F) - Includes 2x 45 degree sections.

To complete a 'half circle' or 180 degree curve, you'll need the  'easement' or 'approach' package (2 x 22.5 = 45 degrees), plus 2 packages of the Curved track (you'll end up with an extra piece unfortunately since you only need three of these [ 3 x 45 = 135, + the 2 easements/approach tracks which add another 45 degrees; so 135+45  = 180]. degrees). If you want a fill circle of track, then you'll just add another package of Easements and one more package of curves - and no extras!


Also, I just noticed that if the 391 radius is too large for you,  Hobbysearch Japan also has a 354 mm radius version out now! 

Kato Unitrack 

Easements: Kato Item 20-182 "Concrete Tie Double-Track Superelevated Easement Curve Let, Right 414/381-22.5" Similar to Tomix, you get 2 22.5 degree pieces in this package.
Super-Elevated Curves:  Item 20-181 "Concrete Tie Double-Track Superelevated Curve 414/318-45".  The options for Kato are the same as Tomix above regarding how many packages of each you'll need.

Also, Kato has the same curves in a double track viaduct configuration as well.  I've also heard that there's a smaller radius version of the double-track super-elevated  curves, but I haven't seen it.

Saturday, December 5, 2009

Quinntopia....1 Year Anniversary!


Thanks to all my new 'internet' N Scale Friends:

December 1st of last year was the first post on this blog.   As I look back over the past year on this little blog I started, I thought I would share some of my thoughts -and thanks!-for the journey that this first year has been.


When I started this blog, I thought that it would be primarily a Minitrix focused blog.  The main reason is that I really love the brand for both its marketing, their product quality, and for sentimental childhood reasons.  There is also very little content on the internet for English language readers (especially for their more modern, Continental output).  However an interesting thing happened in that time as I got to meet more people through this blog and other forums, and I started to see that my knowledge of other N Gauge areas grew along with my evolving and expanding interest in them.

So its been a fantastic journey, and I am truly thankful for the new friends I have found through this blog.  A couple of folks I really want to mention are Don who also goes by "Captain Oblivious" and runs a blog  (Akihabara Station) that was, and is, a huge inspiration to me.  Don also contributes a lot of time and energy to running what is one of the best N Gauge forums around over at the Japanese Rail Forum.   He's been a faithful visitor to this blog, and has always been swift to offer thoughtful and meaningful advice and information, and needed encouragement! Even though his interests are Japanese, he was open-minded enough to link to my blog even though its very clear I stray far from pure Japanese models!  Thanks Don!

I've also been - what's the right word?- honored to get all the positive feedback from those that have commented, and then returned to read other rants or comments I post, but whose names I don't know.  I hope that what I've been able to post has been entertaining, informative, and encouraging for all of you in this fascinating hobby.

I was very flattered by Ken B., who I shared emails with over the summer, who used my track plan as the basis for his own layout.  Thanks Ken! Looking for an update on your progress soon!

I also should thank all the forums and blogs that have kindly allowed me to list my blog on their sites.  From the Japanese Rail Forum, NScale.net, NScale.org, NScaleLimited forum, and, of course, the Yahoo! Groups Unitrack Forum.  

Also, this blog is a collaboration from folks which I always try to link or attribute credit to.  I've gained a lot of valuable information and learned exciting new things to do - ranging from wiring Kato Unitrack switches with LED's, modeling and painting buildings, and the always challenging DCC installation and programming questions, from such great gentlemen and teachers as GR Stilwell on the Yahoo Unitrack Groups (I'll be sharing the work using his BCD circuit in a future post), Martin, Bernard, Cteno, westfalen, nik-n-dad, serenityFan, and dozens of others for various inspiration for modeling, DCC, and Japanese manufacturers, from the aforementioned Japanese forum; Bob/Scaper, for his inspirational 'urban modeling' work on Flickr;  MooseID, Jimmi, MisterMahony, Gary60s, Frank, DigitalDremz, Perth45, Ghill and a host of others from the NScale.net, NScale.org and NScaleLimited forums.

Wow.  That's quite a list!  There's even more of course... there are folks on some of the non-English N Gauge forums who have also provided inspiration, however, I tend to be something of troll if I'm using Google translate to read the content. What I can say about these-and a lot of other folks-I've 'met' over the past year while working on this blog or learning more about N Scale, is that they are all pretty cool guys.  This is not something most people would say about 'model train' geeks, but in my view, 'most people' are wrong!  And I'm pretty honored to have learned or been inspired by all of them.  Thank you gentlemen!

A Year of Numbers:

So some 'fun facts' about this blog.  Its grown in ways that are pretty flattering.  Here's a chart from Google Analytics showing the number of visits since February 7th (I didn't get the tracking code from Google installed until then, so I missed the first month).

Pretty amazing! Hopefully this means I'm doing something valuable!  The blue line above shows visits per day, while the red line is a trendline 'averaging' out the visits to get a sense of trajectory.  Bottom line: visits have grown from about 10 per day back in February to over 30 in the past couple of months.  Wow.  Thank you!

How do people get here?  This was interesting to me, take a look:

Obviously, Google is a HUGE driver of visits to this page (and below are the top keywords that bring up this blog in the search results).  Somewhat flattering are the number of 'direct' traffic sources (e.g. bookmarked or typed in), which means people are returning.  The third one is interesting, and its from Google Images. More on that below in 'things I've learned'. Finally, lots of traffic from my friends at the Japanese forum! :-)   Surprisingly to me is the volume that Yahoo!'s search has driven.

Keywords tell a story of how people got here, and some sort of indication of what's most interesting to them I think:

What's not too surprising to me, is that there are a lot of folks (like myself) looking for help and/or information on the Trix Mobile Station.  This is an area where I wish I had a better grasp of it myself so that I could offer some better insight than I've been able to thus far.  Again, somewhat flattering, is the number of specific searches for this blog. At the bottom is the Kato Thalys.  This is really interesting as you'll see from the traffic on my most visited posts....


The above is a list of the total number of pageviews to various posts on my blog.  I've exluded the 'homepage', so these typically represent specific clicks on posts, which seems to indicate interest, no? Its no surprise that Unitrack oriented posts are huge given the number of users of this track system-and the number of questions! Hopefully I've been able to help those visitors to this blog who've come here for that reason.  The Kato Thalys' traffic is just amazing.  This is apparently a very popular train!  The next most visited post after the Unitrack, layout planning, and Thalys topics, is a Minitrix French diesel (BB 67300), which was a bit of a surprise to me! In truth, its a beautiful engine with outstanding lines and design, but not really as well known, perhaps, outside of France, so pretty cool.  The Dutch RAM Tee also gets a surprising amount of traffic, which I think indicates a higher level of interest in trainsets generally more so than just stand-alone locomotives for a lot of folks doing online research.  Of course, the Dutch are great N-Scalers too!

So, where are my visitors coming from? No surprise, that language is the biggest determinant of who comes to Quinntopia as indicated by 3 of the top 4 counties:

I'm very gratified to see high visits from Germany since I recieved virtually no visits from Germany for the first several months of this blog.  I'm not too surprised by Netherlands, France, and Japan (although I hope to see more visits from Japan, but I also understand that the translation issue is big given my own experiences trying to read translated Japanese sites!) since I've profiled locomotives or manufacturers and products from each of those countries more than once, but Italy and Spain do surprise me!  Welcome Italy and Spain!  One of the things that I have noticed about this N Gauge hobby is the level of interest by country.  A pleasant surprise to me was the popularity in Spain (I kind of knew about Italy given the history of Rivaross, and have only recently discovered several N Scale producers in  Spain).

What's really fun about checking these numbers is the 'internationality' of this hobby.   Besides those in the top 10, and other "Western" countries (Belgium, Sweden, etc...) which can be somewhat expected, there's also decent amount of traffic from Singapore, Brazil, Indonesia, Chile, and Turkey!  How cool is that?!


Final Thoughts:

One of the things I wanted to do with this blog, was not be an 'expert'.   There are a lot of experts who have a lot to contribute, but it can be intimidating and discouraging to realize that your knowledge (e.g. electricity/DCC), skill (building, modeling, soldering), and resources are not as good as others.  The folks I mentioned above have all been inspirations and encouragement and each have given of their time with humility and patience and good material on the web or forums.   It is their example they have set that I hope to share, and will try to continue to share, with this blog.  As I explain on my 'about me' blurb, I do this N Scale stuff becuase its fun, interesting, and inspiring....not just the trains...but the connections I can make with others on a forum, through email, or this blog.  If you're not sure if you should comment or post or ask a question on a forum or on this blog, do not be!  All are welcome, and ignore the grumpy 'bad apples' (who really should consider moving out of N Scale to O Gauge or something).

What I've Learned So Far:
  • If you want to start a blog, or already have a blog, let me - and others - know!  You've got to self-promote, as 'self-serving' as that may sound, there really is no other way for people to know 'you are there' (of course, it helps if your focus is similar to the blog or forum or whatever site where you want to 'promote' yourself!) 
  • List your blog wherever you can - particularly where its most relevant
  • In light of the above, BE CAREFUL about self-promoting your blog in forum postings! It comes off as very self-serving and...tacky.  But I always feel its okay IF the information your are linking is relevant to the thread.  But DO add your url to your signature so that folks like myself can choose to find out more about you.
  • Provide an accurate and exciting description of your blog!
  • Be consistent with blogging.  I've had to discipline myself to think up and be creative about what to post (which is acutally fun for me), even during 'slow times'....I think if you don't maintain some activity on your blog, people will assume you've shut down.  The reality is, the past 6 months has been about creating a lot of buildings for my layout (and I'm sort of surprised that my site traffic has grown...perhaps there is more interest in this area than I think, but certainly not as much interest compared to locomotive reviews, layout pictures and plans, or Unitrack).  This sort of 'urban modeling' stuff only appeals to a very small segment of fellow hobbyists, which is okay, but posting about another building, etc.. can get sort of boring.  So what else can you share?  The post I wrote on "N Scale Cars" was just something I thought would be interesting and break up a series of 'building' oriented posts.   The inspiration came from a post on the Japanese forum, and it was an interesting topic for a lot of folks, and I could use my blog to share some photos and observations of my own "N Scale Cars".  
  • Use pictures...and add meaningful titles to those pictures!  Why?  First, look at the number of visitors who have come to my website through a Google Image Search....you can help Google image search by changing the 'meaningless' default coding / naming that your camera creates for your photos, with a relevant description...which could be the name of the train, the manufacturers model numbers, etc...  this really helps for people who look for pictures of things they want to learn more about!
  • Distribute your 'content'.   While not a big source of traffic for me, if you have videos, post them on YouTube, DailyMotion, and other video sites, and provide a link and description of your blog for folks who come across your video.
  • Build your own 'brand'.  Yes, you can do it.  Its all about developing a style, an easy to remember name, and being consistent with it.  It really does help!
  • Use tools like "Google Analytics" to help discover what works...in other words, what people like and want more of!  I think I made a mistake with a clever/stupid German name for my post talking about my Unitrack experience! What a dumb idea! Most people don't know what "Unitrack Obersten" means if they don't speak German! Yet, it still gets a decent amount of traffic.
  • Remember...for most of us, this is a hobby, not politics. :-)  There really aren't 'right' and 'wrongs'.  There are 'more prototypical' and 'more detailed' etc... but that is not always the goal of everyone else into N Gauge!
  • I also think its better to keep it uncluttered.  Previous or long time visitors may recall that I used to have several 'webring' ads or promotional gadgets in my sidebars.  They're all gone now.  First they really didn't bring in any users, and second, they make the website ugly, and most webrings aren't really well managed, so the next 'site' in a webring could be totally off topic.  Better to focus your energy on creating good content that search engines can 'pick up' for people really looking for it.  And yes, I don't, and won't, have ads.  Google is always pushing their 'AdSense' product on Blogger users. That's just my personal thing.
That's it! No more blogs about blogs (at least until next year!).   Finally, thanks to my wonderful wife and her encouragement, support, and patience with me through all of this!

    Saturday, November 28, 2009

    Tomytec and Tomix buildings

    Well, after the 19 or so stories of the "Godzilla Corporation's" high-rise office complex, time for a break with some smaller, gap-filling structures.

    Way back in February I blogged about how fun the Tomytec building collection ('The Town (Machinami) Collection No.7' to be exact) was. Although the quality isn't great (more on that below), the relative value and diversity of building types is very intriguing for anyone looking for something a little different in their N Scale structures. Plus, they're a lot of fun.

    I've done a couple of minor modification to a couple of these, I blogged about the KFC 'conversion' already, and below is a photo of a Chinese restaurant with relatively minor changes.


    This was an easy three or four LED modification, with a 'homemade' Peking Garden sign (backlit with LED's) over the front.

    You can also make out some of the 'quality' issues with this series in that photo, and its really to be expected.  The walls, floors, etc.... are somewhat warped, and the method that is used to assemble them (which is really just sliding tabs into grooves and held there by friction) tends to result in less than flush corners and joints.  This is not a design problem for Tomytec, as it appears these are aimed for more of a toy-like collector than serious modelers.  In truth, this doesn't bother me much, and there's some things you can do as a modeler to address these issues that are pretty simple.

    On the other hand, the amount of screen printing or painting that goes into each one of these models is very much surprising compared to the standard fare seen in most 'serious' kits, and I've yet to actual repaint one of these Tomytec models as their colors and detailing actually work quite well (particularly for 'fill areas' in my city that won't be highly visible).  I should also mention that you get a little packet of 'detail parts' with virtually every building as well, including stairs, signage for the roof, and other various pieces that are made to snap into various holes placed in the roof, floors, walls, etc....

    One thing that doesn't look right about the above picture? Well, if its going to be in a 'city', then its not going to sit all alone without some neighbors next to it! And that, my friends, is one way of addressing the 'warped walls'.

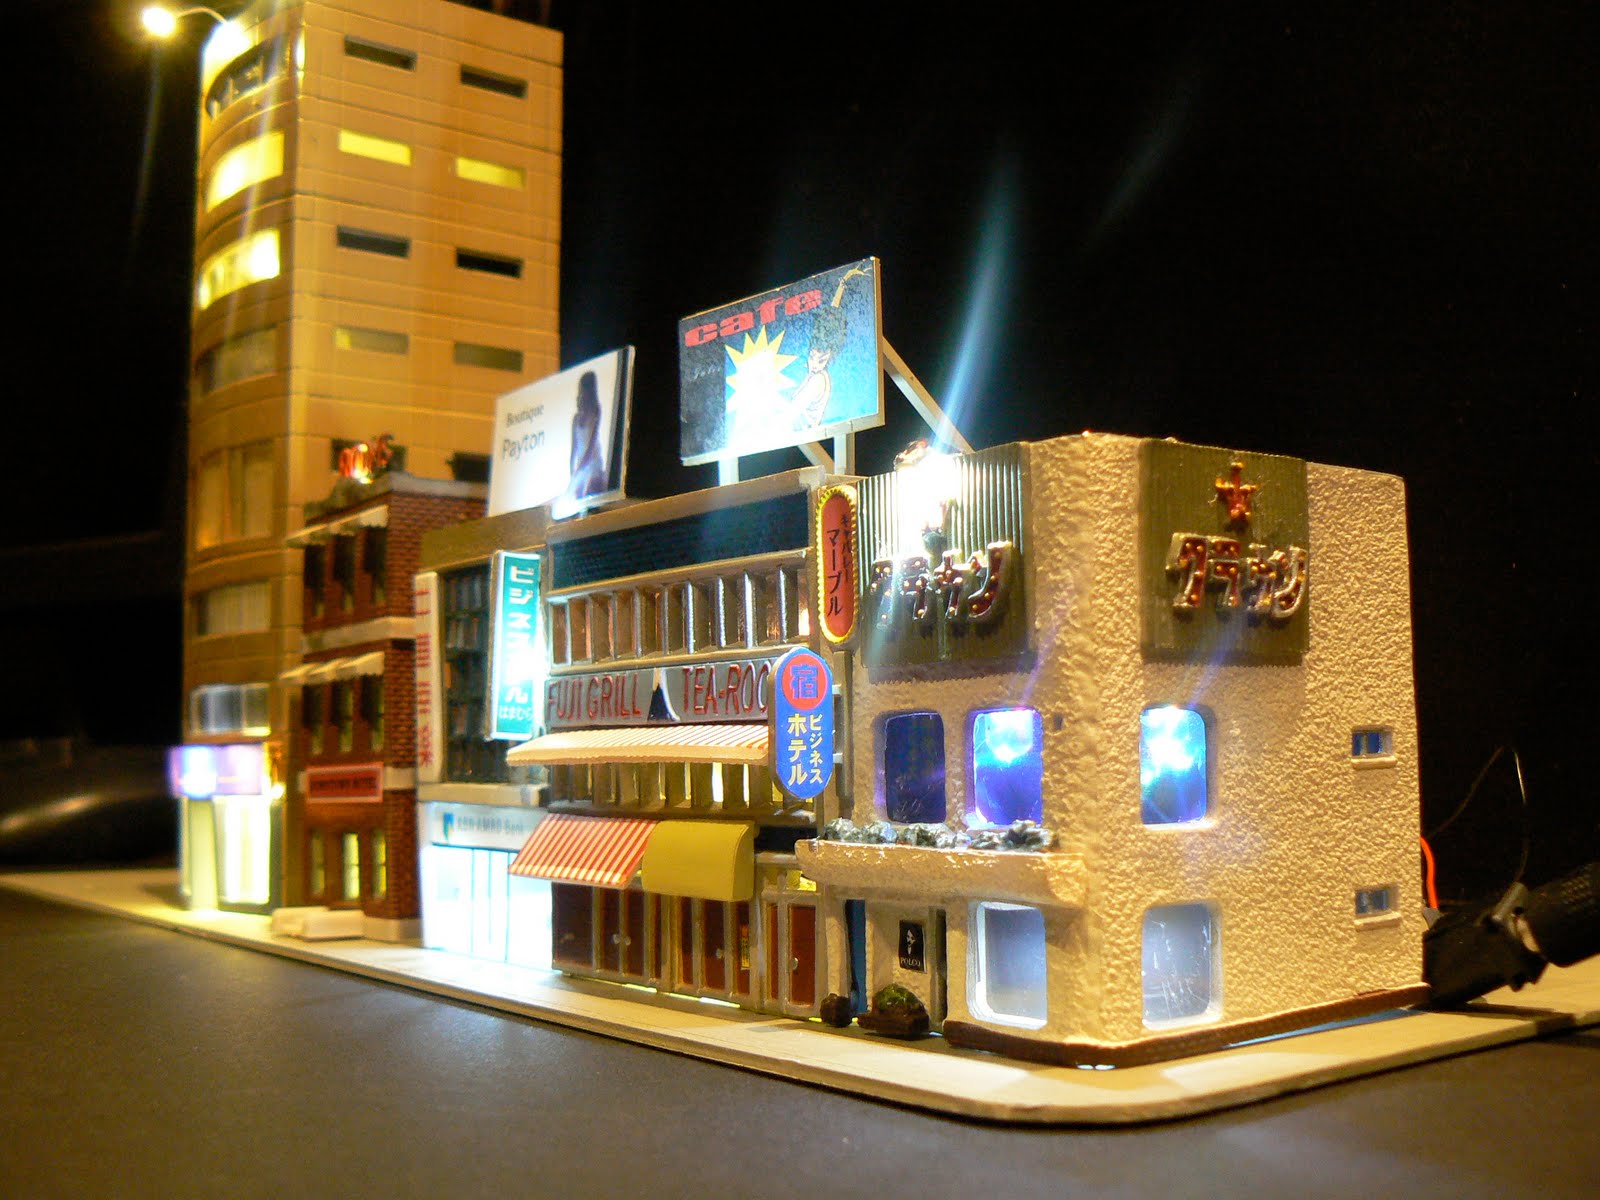
    The next project combines three of the TomyTec buildings, removes all the walls (in fact, the center building is actually a corner building that has a triangular footprint) and leaves nothing except the storefronts (only one of which was modified from a very 'traditional' looking Japanese storefront, to a more modern plate glass sort of front).

    The following photos show these buildings in the middle of construction prior to the lighting and final 'details':


    The building with the clear plastic 'front' is going to end up as a 'bank', the middle building stays untouched (I like the "Fuji Grill" name and graphics too much), while the corner building on the end, with a sort of stucco exterior, gets some crazy color-changing LED's (a nightclub perhaps? not sure what the Japanese characters on it say the building is, but I think a shady little club in the city will work!).


    From the 'other side' of the block:

    Yes, that brick building on the far left is not part of the Tomytec collection, but I think it looks like it would fit right into this neighborhood.  I think this will make an interesting little area of my city...after the cold, serious 'high rises', this will look like that block not too far off where things are just a little bit edgier!

    One other recent project has been the Tomix 4048 'bow front building' conversion to a hotel.  This was relatively easy, but took me forever due to distractions from other projects.  I originally came across this building on Scaper's impressive Flickr site, and knew that I had to have one.  I used two kits, and tried to use the extra ground floor as a 'normal floor' (albeit with high ceilings), to pull this off, I added a strip of styrene in the doorway gap, some clear plastic for the window, and hopefully pull of something that looks like it could be a 4th floor ballroom or something.
    I also went a bit overboard and added some interior detail.  I made two 'beds' out of various plastic parts, used scrap paper for wallpaper, and added an  LED for a table lamp (in addition to a third LED that is right above the window shooting down) and of course, a figure doing something.

    By the way, its important to get a light source as near to the window as possible (you can see my LED in place below, which did require some milling of the frame above it when I put it together), if you place a light near the 'back' of all your detail, it puts all your detail work in shadow, thus losing a lot of the value of doing this sort of work in the first place.


    Here's a shot of the final 'room' with the lady standing there.

    Arghh... yes, there's still an unslightly gap there between the building sections (still not done).  And a final shot of the building just prior to its getting its signage (the "Mercuit Hotel"....a name my daughter came up with that means nothing at all!).


    The ground floor has some basic 'hotel registration' detail as well, nothing fancy (although I did use the elevator banks that come with the Tomix kit), just a few figures, scrap paper glued to foamcore to simulate  a desk, etc...

    With this building, I also used an old technique that modellers have used to simulate window blinds for the first time.  I don't recall the name of this tape (and it was hard to find), but prior to duct tape, this is the sort of thing you would use for packages.  It really does give a good simulation of blinds or drapes (and now I have a huge roll of it for future buildings)!

    Thursday, November 19, 2009

    Creating a skyscraper from scratch (Part 3)


    This should be the final post on my attempt at 'scratch-building' an N scale skyscraper! In Part 1, I talked about the materials I used and the basic look; in Part 2, I described how I created the sidewalls, floors, and dealt with interior 'details'; and in this post (Part 3, if my math is right!), I will describe how I addressed the ground floor, and wired it up!

    Ground Floor:

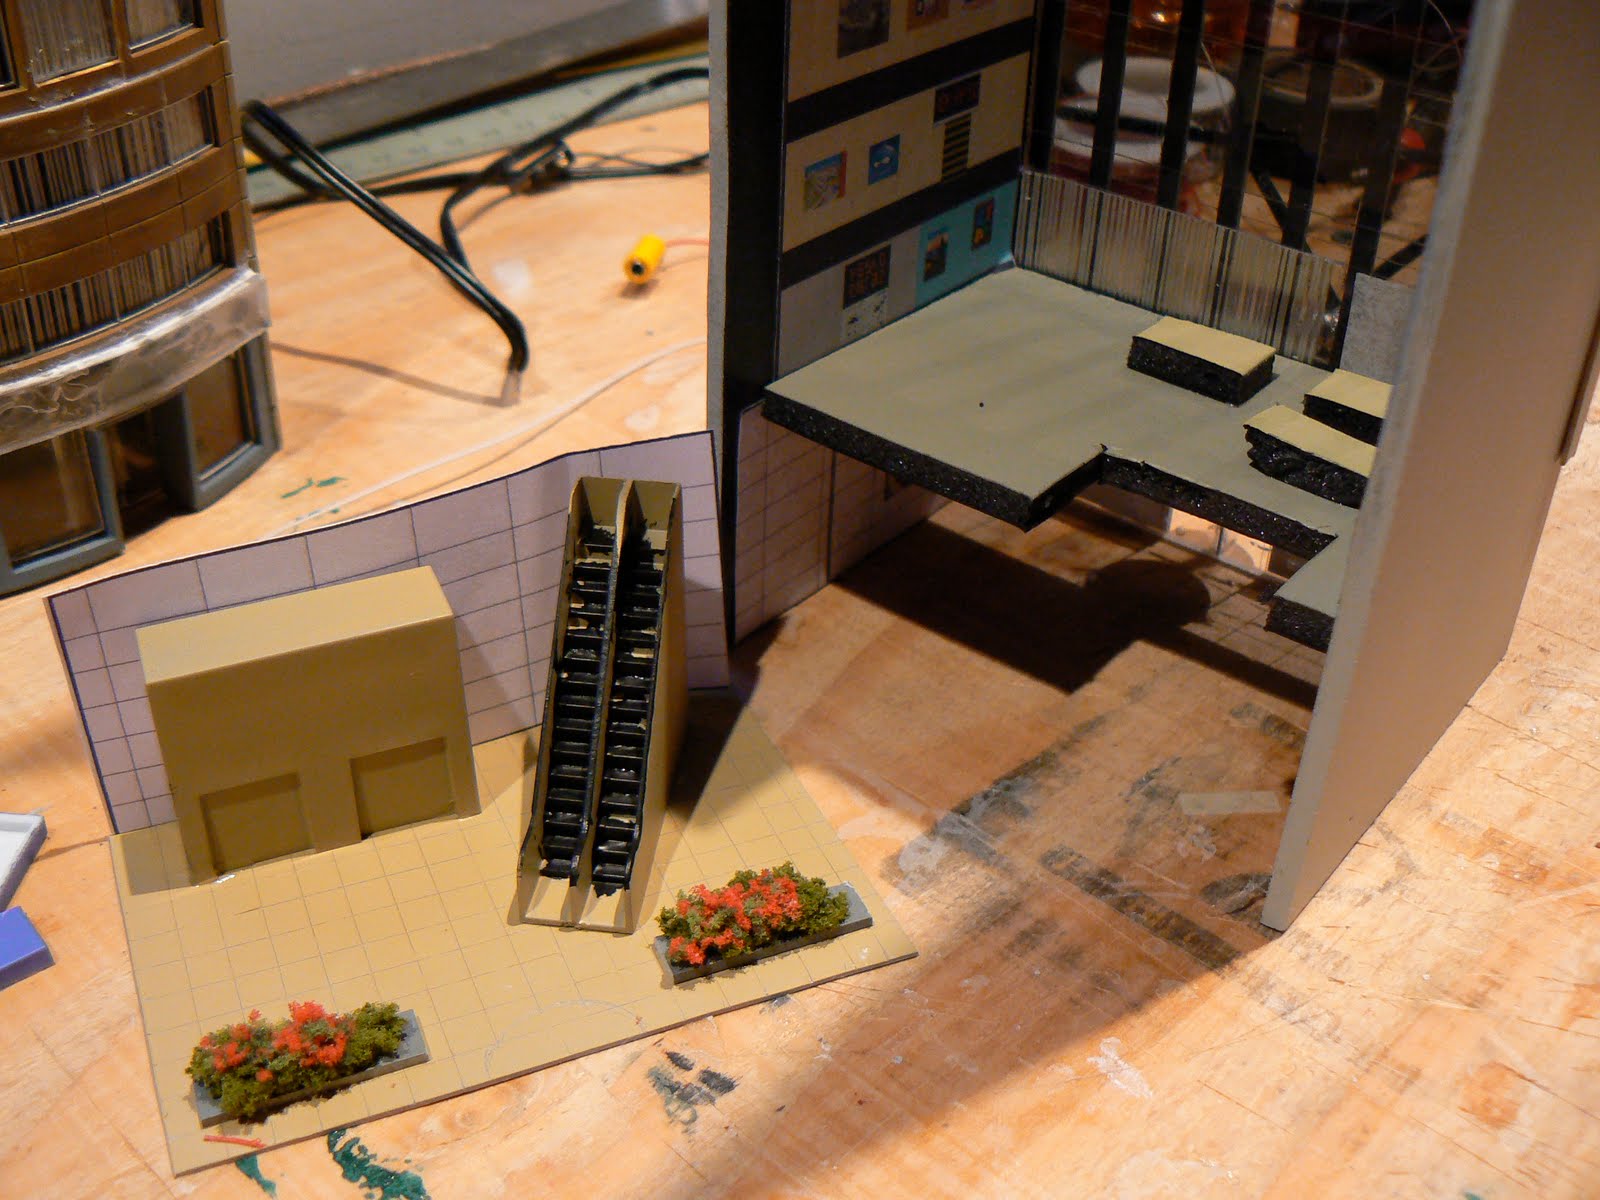
    For the ground floor I decided that this was a pure office building - without any sort of retail businesses. I think we all know these buildings...usually a cavernous space with elevators, escalators and some modern art on the walls. Fortunately, this was easy, as I used some excess escalator and elevator pieces left over from some of my Kato structures (or maybe Tomix, forget which), applied a neutral looking tan color to a sheet of styrene for the floor, and printed out some fake 'walls' for the sides.
    As I talked about a bit in Part 1, the trick with scratch-building buildings is the question of how do you make windows (walls are easy, right?)? Well...doors are a similar challenge! For the lobby entrance to the "Godzilla Corporation's" high rise, I had to improvise yet again. Most of the glass/window 'detail' is merely etched lines on plastic, but I wanted something a bit different so I attempted to try my hand at a 'revolving' door for the building entrance. This was pretty simple to create, as all I did was use a round piece of plastic that was about the right size, sliced it in half, and then glued both halves to the entry lobby plastic. Unfortunately, I messed up a bit and used CA glue (aka "super glue") when I should have gone with plastic cement, thus the ugly-looking 'fogging' around this part. Arg!

    I used some excess metal wire leads (from clipped LED's) as the 'metal' parts of the door. While I regret the glue error, overall I think I got the effect I was looking for (and in reality, once on the layout, the 'fogging' won't be noticeable).
    Electrical Wiring:

    As is my obsession, I love to light my buildings! Unfortunately, I'm not an electrician, so I slog my way through this stuff the best I can! For lighting the interior of the building, I am using 3mm LED's (that were ordered online and dirt cheap) with the appropriate resistors. Again, as I'm not much of an electrician, I used a handy website for calculating the resistor code which puts out this convenient wiring diagram:
    The actual LED's are placed in the building by poking the leads through the foamcore on the 'floor' section that will be the ceiling for the floor to be lit (I don't light every floor!). If that didn't completely confuse you, here's a photo that will:
    What little experience I have had with wiring N Scale buildings has shown that creating something to collect and manage all of the resistors and power leads is necessary in order to manage all those wires (uh...that was redundant). I could have tried to create a PCB board (like I know what I'm doing!), but what I did instead was use a low-temp glue gun to glue the resistors to a narrow board that would act as a 'virtual' PCB board and be well hidden. Below is the initial stage of wiring the top and bottom floors before the 'virtual PCB' is installed (and note the 'notch' in the foam core floors where the wires/PCB board will slot in):
    Once I got to a certain point, I placed the 'virtual PCB board' in the building where I placed the notches and completed all my soldering. Here's the ugly truth of this in all its glory right here:
    After cutting out small rectangular openings on the top of the building for the corporate logo (made with several layers of laser-printed 'transparencies' and back-lit with LED's), and the initial work on the roof started, its time to plug this thing in and get a sense of whether or not I've been able to achieve a reasonable looking skyscraper!
    Oh yeah, that LED sticking out of the top of the building is actually one of two blinking red LED's that I got from a company called "Evans Designs"....I've found their flashing LED's look good and already come ready to install with all the appropriate electronics and can be hooked right to the 12v DC power source. Once the roof is finalized, these blinking red LED's will be placed at the corners of the roof (which brings the total LED count to 29!).

    The floors with lighting have a few interior details (as described in Part 2). Its a bit hard to make out what's happening on this floor, maybe their roughing up that guy on the right? Hmmm....
    And finally, the 'lobby entrance' with the revolving door and scurrying office workers complete the building:
    And here's another look from the perspective of an N Scale pedestrian:
    In summary, I'm pretty happy. My biggest regret was the accident with the CA glue and I definitely overdid it in terms of 'interior detail' as the floors without lighting are dark enough that the lack of detail would not be noticeable. Additionally (and I knew this going into it) but the 1/2 inch thick smoked acrylic I used for the 'glass' was too thick. Its nice and stable (and heavy!), but if you look close, you can tell its a thick piece of acrylic! But hey, it was cheap and I didn't need to do any cutting!

    Total cost? Ironically, the most expensive parts were the Evergreeen styrene strips used to create the concrete columns on the fascia/building. I think I have about $12 there. The smoked acrylic was around $3, LED's and resistors was probably around $8, plus $6.50 for the flashing red LED's from Evan's Designs, another $5 or so for the can of 'camouflage gray' paint used for the concrete, and the sheet of foam core was probably another $5 or so. Bottom line? Maybe around $40 or $50 dollars.

    So, the "Godzilla Corporation" finally has their corporate headquarters! Now they can get about their work of urban redevelopment and environmental mitigation (get it? ;-) ) in their fancy new office in downtown Quinntopia! They will soon have neighbors, as I am starting work on another scratch-built high-rise...the Saruman corporation!

    CLICK HERE for Part 1!
    CLICK HERE for Part 2!

    Sunday, November 15, 2009

    Doubling up a Vollmer 7728 Gift Shop


    I purchased a Vollmer 7728 N Scale Gift Shop almost a year ago. It sat on the shelf while I tried to figure out what to do with it, until I finally decided to order another one and attempt to make this a much taller building than the original designers intended, similar to what I did with the Greenmax 29 building. This was a very tricky kitbash, as the front of this building has unusual recesses and different windows on virtually each floor.

    The first step, whenever I put together a new building, is get a paper towel and some water and clean off the sprues. I then remove the parts from the sprues and paint them (given how light the parts are, I usually place them on some masking tape so they don't go blowing off onto the ground or worse!). If I plan to light the building interior, I also put a coat of paint on the inside walls to ensure that no light can pass through the plastic walls.

    My final plan was to combine the top two floors of each model together, as these floors are all 'recessed'. That will make the bottom four floors flush with the building front. I ended up having to use some styrene strips to make the entire front look seamless.


    This is another 'fashion' store (I'm getting my daughter to help me come up with store ideas, and she thought my city needed more fashion stores!) but rather than use mannequins (e.g. N scale figures) in the shop windows as I've done with other stores, I just used images that look like those you'd see in a fashion store window. I sort of expect that this building won't be as visible as others, so I didn't go overboard with a lot of detail like I tend to do with others!

    Again, lot's of LED's went into this building, and there is even one floor where the apartment dwellers can be seen inside (although the photo here is pretty crappy...can't get the camera to focus on the interior!). For most floors, I used the 'window coverings' that Vollmer includes...these do a nice job of simulating drapers and ensure that there's a bit of variety on every floor like you'd expect from a 'real' apartment building.

    On the back side, there are large windows that I diffused with some laquer spray and overlaid with some clear orange acetate. I don't even know if this side will be visible but...well, at least its done.

    All in all, this will be a bright - and colorful!- building on the layout! I still haven't decided what the roof sign will be yet (the sign up there now in the photo is a placeholder) but that can be worked out with other details later!